
Wood Stain Colors, So you’ve just finished staining your wood deck, took a step back, but then realized it’s just not right?
Whether it came out too dark, too red, or too light; we hear you. It’s all common. In fact, we’ve been there so many times. Luckily, even the wrong wood stain colors can be fixed.
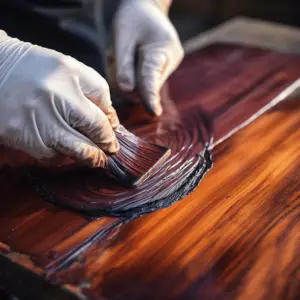
When you use a semi-transparent stain on your woodworking project, the result may appear quite different in comparison to the color on the label. As the hues in the stain blend with the existing color, you might end up with a shade substantially darker, redder, or browner than you expected.
The easiest way to correct your wood stain color is to get a darker shade and apply it to the initial stain job. If darker shades aren’t your type, sanding down the wood structure and re-staining is also an option. Those are the easiest options, but you still have other choices as well.
Table of Contents
What to Do When You’ve Stained the Deck With the Wrong Color

Correct Your Stain Color By Going Darker
Like any competent hairstylist would tell you, you can apply a dark hair color over a light color, but not the other way round.
To transform from a darker shade to a lighter shade will involve stripping and removing the dark shade first. When it comes to deck, the same case applies.
One effective way to fix your deck’s color is by topping it with a solid color stain. These types of exterior staining deliver a completely predictable and uniform color over the wood. Solid shades mask the normal color variations of the deck’s grain and veins while highlighting the wood’s natural texture.
Of course, staining over staining can be more of a gamble as to what shade your wood structure will ultimately become.
To mitigate the risk, take a piece of scrap wood from your project and stain it with your initial stain. Then apply the second stain and check what it looks like.
Where there’s no scrap wood, consider finding the most unobtrusive area of the wood and test there.
That’s how you know what to expect if you apply the stain to the entire project. If you find the new test option better than the current color, go for it. Quick note: check that whatever stain you apply the second time is the same type of stain you used in the first place.
Wood Stain Colors can be a different brand, but at least make sure both are oil-based stains. Try mixing oil and water-based stains and you’ll be inviting trouble.
Wood Bleach
The next alternative is to apply one of several varieties of deck bleaches/strippers to the initial stain job.
With this technique, you first need to make sure the wood stain has completely dried so you don’t end up with a toxic chemical reaction.
We recommend waiting 1-2 days to be absolutely sure.
As you may have guessed, test the bleaching product on a small area to check it for effectiveness before applying it to the entire deck.
Wood Stain Colors bleach/stripper is okay by you, go ahead and apply it according to the manufacturer’s description. Then rinse the deck thoroughly using a pressure washer or garden hose and leave the surface to dry completely.
Note that although the bleach will probably do something, it’s hard to know exactly what without first putting it to test on a piece.
Test the bleach in an unnoticeable spot of your deck before you start. This way you’ll know what exactly will happen when you bleach the wood.
To bleach the piece, apply the product using a sponge or spray bottle. Leave it on the project for a while before rinsing with water. Dry the piece with a rag or towel, and then let the wood dry for a day or two before adding a topcoat.
Sand Down the Piece
This is probably the most traditional way to fix unwanted wood coloring. Sanding down the peace should only be an option if you have a reliable orbital sandal as hand sanding would require a significant amount of time.
The method is also suitable for the deck is mostly flat as a table or desktop. Sanding curves can be tricky and time-consuming, considering that intricate carvings have to be done by hand.
But if you have a good orbital sander and flat surface, sanding down the wood can be easier than you think.
When starting, use low grit sandpaper (for example 60 grit) and sand until most of the stain is removed.
Get a pencil and squiggle a light line in your wood. Then use the next grit sandpaper (80 grit for that matter) and sand until the pencil squiggle disappears.
Paint Over The Deck Stain
Should everything else fail; painting the wood structure is yet an option. In fact, you might want to go for a double-toned piece, where you’ve stained all the hard-to-sand areas.
It’s possible that you can still achieve the pretty deck look you wanted by sanding down the piece, but you can save yourself the hustle and apply paint over the deck stain.
Keep Off From Wrong Stain Shades In the First Place
Remember you’re only here before you used the wrong stain in the first place. The easiest and most promising trick is to actually test your stain and finish before applying it to the piece.
If you’ve worked on the project from scratch, get a piece of scrap wood and apply the stain in question to the scrap wood.
Go ahead and apply the finish you intend to use on top of it. Note that the finish can alter the look of a stain; thus it’s recommended that you apply both products to make certain you like the overall outcome before you start staining your piece.