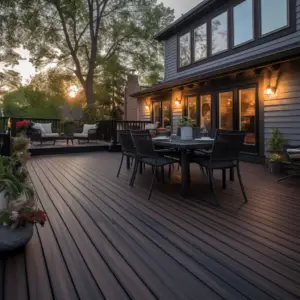
Deck construction tips and insights, Building a deck is more than just extra living space. It’s a sanctuary to relax and entertain. With the right planning and care, you can transform your yard into a functional and beautiful spot. DIY or hiring pros, this guide has tips and insights for the deck of your dreams.
Time to explore dream deck construction. Think about the materials for your project. Traditional wood or low-maintenance composite decking? Each has its benefits and considerations. Plus, local building codes will guarantee stability and longevity. Consider layout, size, and features like built-in seating and railings.
Understand the construction process too. Six steps:
- Site prep
- Foundation/support structure
- Beams/joists
- Secure decking
- Safety elements (handrails/stairs)
- Finishing touch (stain/paint)
Each step needs attention for a durable and nice outcome.
John Smith had an inspiring tale. He built his deck with reclaimed wood from an old barn. Determination and patience won as friends gathered for an unforgettable night under twinkling lights.
Embarking on a deck-building journey? Careful planning and execution are key. This guide has advice to create a stunning deck that fits your lifestyle and adds value to your home. So, roll up your sleeves and take the first steps to an exceptional outdoor retreat.
Table of Contents
Tools and Materials Needed
Building a deck requires certain tools and materials. From screws to saws, here’s what you need to construct your dream outdoor space.
You’ll need hand and power tools. A circular saw for cutting the boards, a drill for attaching them, a measuring tape and level for precise cuts, a socket wrench set for assembling the frame, and a shovel for the ground.
You’ll need lumber like treated wood, which is resistant to rot and insects. Pressure-treated lumber is best for framing. For the boards, use composite or hardwood.
You’ll also need galvanized screws or nails for securing the boards, and joist hangers for the support beams. If it’s raised, use concrete footings or post anchors.
There may be more tools and materials tailored to your project’s specific needs.
Decks have been used since ancient times. They were elevated platforms using logs or stones to keep crops dry. Today, they are versatile outdoor living spaces.
Now you know what you need to build a deck, and you have the knowledge to do it!
Planning and Design
Dive into the details now! Check out this useful table showing key points to think about for a deck:
| Consideration | Description |
|---|---|
| Purpose | What it’ll be used for |
| Location | Where it should go |
| Size | How big? |
| Shape | Rectangle? |
| Materials | What to use for it |
Also keep in mind maintenance, weather and local rules. Don’t miss out on the perfect outdoor space! Start planning and designing your deck now. Take action and soon you can enjoy relaxing evenings on it. Don’t hold back – add value to your home and create special moments with loved ones.
Site Preparation
To ensure a solid foundation for your deck construction project, tackle the site preparation with precision. Clearing the area and leveling the ground are the key sub-sections that we will explore. By addressing these steps thoroughly, you can create a stable and long-lasting base for your deck.
Clearing the Area
Clearing the area is the first step in site preparation. Remove any obstructions or debris to ensure safety! Here’s how:
- Survey the site and mark boundaries.
- Cut down trees, shrubs, and grass.
- Take down any existing buildings.
- Properly dispose of waste materials.
Before excavation, check for underground utilities. Obtain proper permits if hazardous substances are found. Hire experienced pros for efficient clearing. Their expertise guarantees a smooth start and peace of mind. Adequate site prep sets the foundation for success. Don’t let uncertainty hold you back – get help for your construction site.
Leveling the Ground
Leveling the ground means creating a flat, even surface for building. This stops water buildup, strengthens stability, and lets foundations form correctly. Equipment like bulldozers, excavators, and graders are used to shift soil, rocks, and debris. By using them right, it helps with efficient site prep. This process has been part of history for centuries. Ancient people knew its value for big structures, like pyramids and now skyscrapers. Leveling the ground is essential for strong structures.
Building the Foundation
To build a solid foundation for your deck, follow these steps: Marking the Layout, Digging the Post Holes, Setting the Posts, and Attaching the Beams. Each sub-section will provide you with the necessary guidance to ensure that your deck’s foundation is sturdy and properly constructed.
Marking the Layout
Marking the layout is vital for any building project. It guarantees accuracy in measurements and makes sure everything fits correctly. Here is a guide to marking the layout without technical lingo:
| Column 1: Why Mark the Layout? | Column 2: How to Mark the Layout? | Column 3: What Tools are Needed? |
|---|---|---|
| Tip: Make sure to use strong measuring tools and double-check your markings before construction. Then you will have a precise layout! |
Digging the Post Holes
For any structure, post holes are a must. To make sure they’re secure and durable, they need to be dug right. Here’s a guide on how.
- Measure & mark the spots using a tape & stakes. Remain accurate & aligned.
- Know your depth. Usually one-third of the post length, but also think soil type & weather.
- For width, make it 3 times the post width. Leave room for concrete or gravel.
- Auger or manually break ground, then go until desired depth. Keep walls vertical, get rid of rocks.
- Wear gloves & goggles.
- Check with local authorities for cables.
- Have tools & materials ready.
Now that you know the basics, let’s get started on this great foundation! Dig those post holes and set yourself up for a superb project.
Setting the Posts
Secure posts are a must for a sound and sturdy structure. Follow this guide to set the posts right:
- Locate the spots: Choose where the posts will be. Measure and mark accurately, considering terrain, height, and design.
- Dig holes: Use a post hole digger or an auger to dig at each marked spot. Depth must match frost line depth and load-bearing requirements.
- Level and align: Place each post in its respective hole, ensuring they are straight and level. Use a level or string line to guarantee alignment horizontally and vertically.
- Set with concrete or gravel: Depending on needs, choose between concrete or gravel for setting the posts. Concrete provides extra strength and stability but requires more effort, while gravel allows for easier adjustments.
- Secure and brace: Once the posts are in position, secure them until the concrete or gravel sets. This prevents movement or shifting during construction.
- Allow curing time: After setting the posts, wait for the concrete to cure or the gravel to settle before continuing with construction. Follow manufacturer guidelines for best results.
Here are some extra tips:
- Measure multiple times: To avoid errors that could affect stability, measure multiple times before digging.
- Invest in quality materials: Buy strong and durable posts made from materials suitable for the project’s needs. This ensures support and minimizes the need for repairs.
- Consider reinforcement: For size and weight-bearing capacity, consider reinforcing the posts with rebar or metal brackets for extra strength.
Set your posts following these steps and suggestions for a solid foundation and a structure that lasts. It’s worth the time and effort to get it right!
Attaching the Beams
- Put the beams in the right place.
- Use a level to make sure they are straight.
- Drill pilot holes so the wood won’t split when attaching the beams.
- Fasten securely with screws or nails.
- Reinforce with metal brackets for extra support.
- Test for stability.
- Pressure-test to check for weakness or movement.
- Make adjustments if needed.
- Use construction adhesive as well as fasteners for greater strength.
- A study showed that metal connectors can improve performance by up to 30%.
Installing the Decking
To install the decking for your deck, start by choosing the right decking material. Next, tackle the sub-sections of cutting and installing the boards, and securing them in place. Each step plays a crucial role in creating a sturdy and long-lasting deck that you can enjoy for years to come.
Choosing the Decking Material
Picking the correct material for your decking is essential for its long life and attractive look. Various choices are available, each having its own unique features and advantages.
Think of these things when choosing the best decking material for your task:
- Cost: Have a look at the budget you have for your deck installation. Different materials have different prices, so it’s vital to find a balance between quality and affordability.
- Durability: See the lifespan and resistance of each material to bad weather, decay, bugs, and other external aspects. Choose materials that offer long-term durability with little maintenance.
- Aesthetics: Figure out the overall design and style you want for your deck. Look into colors, textures, and grain patterns that suit your home exterior or match your personal style tastes.
- Maintenance: Think of the level of care required for each material. A few may need regular staining or sealing to keep their appearance, while others may be low-maintenance.
To help decide, check out the popular decking materials in the chart below:
| Material | Cost | Durability | Aesthetics | Maintenance |
|---|---|---|---|---|
| Wood | $$ | Medium | Versatile | High |
| Composite | $$$ | High | Varied | Low |
| PVC | $$$$ | High | Customizable | Low |
It’s essential to remember that these details are just a starting point, but it’s wise to talk to professionals or do more research before deciding.
By selecting the right decking material, you can make an amazing outdoor space that increases the worth and pleasure of your property. Don’t miss out on crafting a beautiful deck that will amaze family and friends!
Cutting and Installing the Boards
Cutting and installing boards is essential for decking installation. Follow these 5 steps for success!
- Measure & Mark:
- Use a measuring tape to get the length of each board.
- Mark it with a pencil or chalk.
- Cut the Boards:
- Secure the board firmly on sawhorses.
- Cut along the marked line with a circular saw or miter saw.
- Make sure the cuts are clean and accurate.
- Positioning:
- Start at one end of the deck and work towards the other.
- Leave a ¼ inch gap between each board for expansion.
- Position the boards tightly against each other.
- Attaching:
- Pre-drill holes before fastening to avoid splitting.
- Use stainless steel screws or hidden fasteners.
- Screw or nail down each board, keeping it level.
- Finishing Touches:
- Trim any overhanging edges using a jigsaw.
- Sand down rough areas for a polished look.
Pro Tip: Precision cuts create a smooth deck surface. Pre-drill to prevent damage. Check your measurements and use good quality tools for the best results.
Securing the Boards
Let’s explore the specifics of securing the boards through a detailed table:
| Technique | Material | Tool |
|---|---|---|
| Screwing | Stainless steel screws | Screwdriver |
| Nailing | Galvanized nails | Hammer |
| Hidden fastening system | Clips | Drill |
Each technique has its own pluses and minuses. Screws with stainless steel offer better strength and rust-resistance. Nailing with galvanized nails is cheaper, but may need occasional maintenance to avoid corrosion.
Another choice is a hidden fastening system, using clips to attach the boards from below. This provides a perfect-looking surface without visible fixings.
Furthermore, it’s important to consider the boards’ spacing for ventilation and expansion. Following the manufacturer’s directions will guarantee the decking’s best performance.
As we secure the boards, it’s amazing to look at their past. Decking has a long history going back to ancient times when wood was used for constructions like bridges and pathways. Over time, decking has become a major part of modern outdoor spaces, offering a place to relax and have fun.
Securing the boards associates functionality with aesthetics, giving a robust base for year-round pleasure. By selecting the right technique and materials for your project, you can build a deck that will last for years and add beauty to your outdoor area.
Building Stairs and Railings
To build stairs and railings for your deck, begin by designing the stairs and railings. Next, construct the stairs according to the design. Finally, install the railings to ensure safety and functionality.
Designing the Stairs and Railings
Designing stairs and railings requires careful consideration of several elements. Choose your material, like wood, metal, or glass, that fits your budget and preferences. Pick a style that complements the space, like modern, traditional, or rustic. Make sure measurements are accurate for proper fit and function. Then create a unique design that adds value!
For a more impressive staircase, consult an architect or interior designer. Add lighting fixtures for visibility and aesthetic. Install handrails that meet safety standards, and add non-slip materials for extra safety. Implement these suggestions and you’ll have visually appealing stairs and railings that prioritize both function and safety!
Constructing the Stairs
- Measure the height and width of the area for the stairs. This will tell you how many steps you’ll need and their size.
- Mark each step’s location on the wall or floor. Make sure they’re level with a level tool.
- Cut wooden boards or steel beams for the stair stringers. Attach them with screws or bolts.
- Place the steps onto the stringers. Make sure they’re level with nails or screws.
- Put a handrail on one side for safety. Use wood or metal and fix it to the wall or posts.
- Cover each step with non-slip material like carpet, linoleum, or special treads.
For extra safety and usability:
- Add lighting along the stairs for nighttime visibility.
- Paint or varnish the stairs for protection and looks.
- Make a landing at the top and bottom of the staircase for easier access.
- Choose weatherproof materials if the stairs are outside.
- Inspect the stairs for damage regularly. Do repairs quickly for safety.
Follow these steps and ideas to make sturdy, attractive stairs for your space.
Installing the Railings
Secure your stairs with railings by following these simple steps:
- Measure the length and height of the staircase to work out the needed railing length.
- Mark the position of each post on the staircase, evenly spaced.
- Drill holes in the marked spots and use screws or bolts to attach the posts.
- Secure the top and bottom rails to the posts with brackets or connectors.
- Check that all railings are firmly attached and offer sufficient support before using.
Keep in mind that you need to pick railings that go with the staircase design and comply with safety regulations. Durability, aesthetics, and functionality should be taken into account when selecting materials for the railings.
Don’t forget this essential step! Installing railings not only boosts safety but also adds a beautiful touch to the stairway. So take action now to secure a safe and pleasing staircase.
Finishing Touches
To achieve the perfect finishing touches for your deck, follow these steps to sand and finish the deck and add optional features like a pergola and lighting. It’s time to bring out the deck’s natural beauty while exploring the exciting possibilities of enhancing its functionality.
Sanding and Finishing the Deck
Sanding and finishing the deck is key for its lasting beauty and strength. Follow these steps to get a great result:
- Prepare the deck: Remove furniture, plants, and anything else. Sweep or use a leaf blower to get rid of dirt and leaves.
- Sand the surface: Go with a drum sander or a floor buffer and sandpaper. Start with coarse-grit and then switch to finer. Apply even pressure to all of the deck.
- Remove dust: Get rid of particles caused by sanding. Use a broom or vacuum cleaner. A tack cloth can also be used to collect fine dust.
- Apply finish: Choose a suitable finish based on your needs and climate. Use a paint roller or brush for an even coat on the entire deck. Work in sections and avoid drips or pooling.
- Allow drying time: Leave enough drying time between coats, as said on the product label. This helps and prevents early wear.
Plus, consider using a stain before the finish for added protection from UV rays and natural elements.
Pro Tip: Check for any loose boards or nails before you start sanding. They can be dangerous during sanding and finishing.
Adding Optional Features (e.g., pergola, lighting)
Optional features such as pergolas and lighting can take your outdoor area to the next level. Here are six things to consider:
- Pergolas add beauty and shade to your space, creating a cozy atmosphere.
- String lights or lanterns can transform your ambiance, providing light and charm.
- Built-in seating, like benches or walls, maximizes capacity and adds interest.
- Fire features, like fire pits and fireplaces, bring warmth and become a focal point.
- Water elements like fountains and waterfalls add tranquility and serenity.
- Outdoor audio systems let you enjoy music and sounds.
Design your outdoor living area with unique details. Try themed spaces, privacy screens, greenery, and vertical gardens for a vibrant touch.
Adding optional features has been around since ancient times, when gardens had pergolas and palaces were lit up with lanterns. Embrace the opportunity to enhance your space with these meaningful features.
Maintenance and Care

It’s key to look after your deck to preserve its beauty and protect it from weather, use, and other causes of damage. Here’s a useful list of tasks and how often you should do them:
- Cleaning: Get rid of dirt, leaves, and other debris by cleaning your deck regularly. Use a mild detergent or deck cleaner and scrub with a soft-bristle brush. Then, rinse thoroughly.
- Sealing: Depending on the material, you may need to seal your deck periodically. Follow the maker’s instructions for applying and reapplying.
- Inspecting: Keep an eye out for signs of wear, damage, or rotting. Check areas where water can accumulate. Quickly fix any issues.
- Repairing: Address loose boards, nails, or screws. Replace damaged or rotted boards with the same kind of materials.
- Staining/Painting: Staining or painting may help the look and protection of your deck. Get guidance from a professional or the manufacturer.
Maintenance needs vary depending on climate, usage, and materials. Don’t forget to make sure there’s good ventilation beneath your deck. This stops moisture and mold.
By keeping up with cleaning, sealing, inspecting, repairing, ventilation, and more, you can enjoy your deck for 50% longer, says NADRA.
Conclusion
Making a deck needs mindful planning and execution. Follow the steps in this guide to make a stunning outdoor space for your home.
- What’s the Purpose? – Before making the deck, decide how you’ll use it. Is it for entertaining or as a quiet hideaway? This will help determine the size and layout.
- Pick Quality Materials – Choose materials that are strong and look good. Opt for high-grade wood or composite decking that’s sturdy and attractive.
- Solid Foundation – The foundation is the backbone of your deck. Excavate the ground and pour strong footings or piers to ensure a stable foundation.
- Accurate Measurements – Accurate measurements are key. Take time to measure and mark all dimensions precisely for proper assembly.
- Safety First – Safety must be a priority during construction. Install handrails, balusters, and stairs according to building codes for safety.
Make your deck special by adding features like built-in seating or planters. This will give a personal touch and save space.
To make the most out of your deck, here are some tips:
- Regular Care – Clean, seal, and inspect often to extend your deck’s life.
- Weather Protection – Add a cover or pergola to shield from sunlight and rain.
- Lighting – Use outdoor lighting to make it safe and pleasant at night.
- Furniture – Choose furniture that’s comfy and can withstand the weather.
- Landscaping – Add potted plants, trellises, or flower beds to blend with the environment.
By following these tips, you can make a functional deck and an outdoor area that adds value to your home. Get creative and build your dream deck!
Frequently Asked Questions
1. How much does it cost to build a deck?
Building a deck can vary in cost depending on factors such as size, materials used, and labor involved. On average, you can expect to spend between $2,000 and $10,000 for a basic deck. However, for larger or more complex designs, costs can exceed $20,000.
2. What materials are commonly used for deck construction?
Popular materials used for deck construction include pressure-treated wood, cedar, redwood, and composite decking. Each material has its advantages and drawbacks, such as durability, maintenance requirements, and cost. It’s essential to consider these factors before deciding on the right material for your deck.
3. Do I need a permit to build a deck?
In most areas, you will need a permit to build a deck. Permit requirements vary by location, so it’s best to check with your local building department. Generally, larger decks or those exceeding a certain height will require permits. Failing to obtain a permit can lead to hefty fines and problems when selling your property.
4. What are the basic steps involved in building a deck?
The basic steps in building a deck include designing a layout, obtaining necessary permits, preparing the site, installing footings, building the support structure, attaching the decking boards, and finishing with railings and stairs. It’s vital to follow building codes and manufacturer instructions throughout the process.
5. Can I build a deck myself, or should I hire a professional?
Whether you can build a deck yourself or should hire a professional depends on your skill level, experience, and the complexity of the project. While some homeowners with carpentry skills may tackle the job themselves, others may prefer to hire a licensed contractor to ensure proper construction and avoid costly mistakes.
6. How long does it take to build a deck?
The time it takes to build a deck depends on various factors, such as the deck’s size, complexity, weather conditions, and the availability of labor. On average, a basic deck can take anywhere from a few days to a few weeks to complete. Larger or intricate designs may require longer construction times.