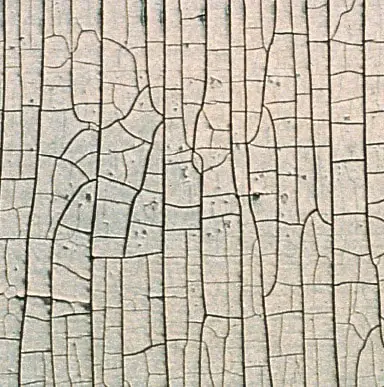
Alligator cracking paint in bathrooms is a pretty common problem among homeowners, especially those who live in the coastal regions. As the name suggests, alligatoring paint cracks in a pattern that resembles an alligator’s scale, which can be somewhat unattractive as it makes a building look odd and poorly maintained. It is a common issue and can happen with any paint.
So, if you’re looking to learn how to fix this problem, it’s important to know why it’s happening in the first place.
Table of Contents
Alligator Cracking Paint In Bathroom: Causes

Alligator cracking paint can occur for a variety of reasons. For instance, it could be that the top coat was applied over an undercoat that was not completely dry.
It can also occur when a rigid substance such as alkyd enamel has been applied over something more flexible, for example, a latex primer.
Alligator cracking paint may also occur as a natural effect of aging and weather changes on oil-based paint.
Another reason associated with alligator cracking paint is when the paint is applied over built-up water and soap scum. Normally, around the things you use every day such as sink, toilet, and showers.
It turns out that the best solution to fix alligatoring is to remove all the paint. Even if the paint has not broken everywhere, removing all of the paint from the paint job and repainting the entire structure or a portion of the building is the best way to remedy alligatoring. That way, colors will match and there won’t be any additional alligatoring.
How to Prevent Alligatoring
Prevention is key, so you need to consider certain measures before you even begin to replace the peeling or alligatoring paint on your bathroom. Bathrooms are notorious for being a haven for mold and mildew. Not merely because they are often smaller spaces; the water and humidity from everyday showers and baths are to blame.
Good ventilation is essential for stopping the paint in the bathroom from alligatoring in the first place. Having a decent fan in your bathroom is important, and it would be ideal if it had a timer to run for at least an hour after you shower. Additionally, keeping a window open in your bathroom can be a terrific idea. It just helps to keep the window closed, especially after you’ve taken a shower.
Other considerable measures for application include using a high-quality primer before painting and making sure every layer of primer or paint dries completely before applying another coat. Also, avoid using rigid substances over more flexible ones. And of course, be sure to follow good prep practices for painting walls such as making sure the surface is clean and dry before painting.
How to Remove Alligator Cracking Paint
Here’s a list of things you’re going to need to make the process of repairing bathroom paint;
- Putty knife
- Paint scrapper
- Protective goggles and a dust mask
- Paint tray
- Bathroom primer
- Vacuum sander
- Specialty bathroom interior paint
- Sheetrock plaster
Scrapping off the Alligatoring paint
First, make sure all areas are dry before you start any of your work. Note that both the walls and the ceilings are affected by this, so try not to use the shower day or two before repairs.
Using a putty knife, take out the flaking paint and start scraping. The scrapping will cause the surface to become uneven, but that’s fine for now.
Remember to wear protective eyewear and a dust mask to stop dust from entering your eyes or lungs, which may be quite harmful.
Using fine-grain sandpaper, sand the area where the paint blisters were removed, and then clean up any dust.
Ensure that all peeling paint has been removed from all areas. The wall should only have paint that is securely attached to it.
Patch Where Bathroom Paint Had Been
Note that the surface will be uneven once the paint chips or paint bubbles have been removed. So, use a patching compound to smooth out the surfaces. You may also want to apply a skim coat of sheet rock plaster. Apply it in a thin layer, using a putty knife.
This coat has to dry completely for at least six hours. You may even give it a full day to dry if you have time to work on the bathroom. After the first coat has dried, you can then sand it smooth.
Apply a Second Coat of Sheetrock Plaster where Necessary, and then Sand Again
You might still get great results with just one coat of sheetrock plaster. But in case you need two coats, be sure to let the wall and ceiling area dry for at least six hours.
Once you are satisfied, you can then apply another thin layer of sheetrock plaster with a putty knife.
Make sure the second application is completely dry before sanding it down with fine sandpaper. Remember to have your protective goggles on while doing this.
Prime the Bathroom Wall Before Painting

Now that everything has been fixed, sanded, and smoothed out, you can think about priming and painting.
Walls in bathrooms typically start alligatoring because they weren’t properly primed in the first place.
At this point, you probably already know that the first line of defense against moisture and water is primer. So if you’re planning on using a high-quality primer, then the latex-based Fresh Start Primer from Benjamin Moore is a top recommendation, especially in bathroom areas.
This primer has exceptional adhesion, is mildew resistant, and dries quickly, which makes it ideal for bathrooms. However, if you choose to go with Sherwin Williams, we suggest that you opt for their Multi-Purpose Latex Primer.
Once you have settled on your ideal primer, get a brush or tiny roller to prime the area you just finished prepping. Then give the primer at least one full day to dry before applying the finishing coat of paint
Paint Your Bathroom
Once you’re satisfied that the primer is completely dry, go ahead and apply the paint. Be sure to choose a paint that has a gloss or semi-gloss finish; such paints do not absorb moisture as other paints do.
If you’re interested in a flat finish, you might want to check the Benjamin Moore Aura Bathroom Walls & Spa Matte. Of course, it’s a little expensive, but it will deliver that sharp finish that flat paints usually provide.


