Cracked Foundation Repair, Imagine this: you enter your dream home and discover a hairline crack along the foundation. Your heart sinks. But don’t worry! We’ll guide you on how to fix the crack.
Act promptly and decisively. Assess the severity of the crack first. Minor, shallow cracks can be filled with epoxy or polyurethane caulk. These materials are available at your local hardware store.
But if the crack is bigger or deeper, you need professional help. Consult a structural engineer or foundation repair specialist. They possess the knowledge and expertise to diagnose the problem and recommend repair methods.
One popular technique is epoxy injection. Inject an epoxy resin into the crack under high pressure. The resin bonds with the concrete, creating a durable seal that strengthens the foundation.
The American Society of Civil Engineers (ASCE) conducted a study which showed that timely repairs of foundation cracks can extend the lifespan of your home’s foundation. So don’t delay – safeguard your home for years to come!
Table of Contents
Understanding the Problem

To understand the problem of a cracked foundation, dive into the causes and signs. Explore the sub-sections: causes of a cracked foundation and signs of a cracked foundation.
Causes of a Cracked Foundation
Cracked foundations can happen for diverse reasons. These can be anything from natural causes to human activities that weaken the structure of a building. A few of the more common causes include:
- Expansive Soil: Clay-rich soil that expands and contracts due to moisture levels can put pressure on the foundation. This can lead to cracks over time.
- Improper Construction: Poor compaction or reinforcement can cause uneven settling, leading to cracking.
- Water Damage: Leaks, poor drainage, and flooding can weaken concrete, making it more prone to cracking.
Other culprits include tree roots, earthquakes, and even extreme temperatures. An example of this was seen with an old building downtown. Road construction nearby caused vibrations that weakened the already fragile structure, resulting in significant damage.
It’s key to understand the cause of a cracked foundation. Taking preventive measures, either during construction or renovation, can protect structures and ensure their longevity.
Signs of a Cracked Foundation
Cracks in a foundation can cause serious structural problems. It’s important to recognize signs of a cracked foundation and take action. These signs include:
- Visible Cracks wider than 1/8 inch.
- Uneven Floors.
- Jammed Doors and Windows.
- Gaps between Walls and Ceilings.
- Bowing or Leaning Walls.
- Excessive Moisture and Mold.
Also, look out for sagging or cracking bricks, mortar joints, chimneys, or concrete slabs.
Recently, a family found cracks in their basement walls. Later, the floors became uneven and they had difficulty opening their front door. A professional inspection found extensive damage caused by soil erosion. Quick action was taken to fix the cracks and stabilize the foundation.
Assessing the Damage
To assess the damage in a cracked foundation, inspecting the cracks and identifying their severity is key. By carefully examining the cracks and evaluating their extent, you can understand the scope of the problem and determine the necessary steps for repair.
Inspecting the Cracks
Crack inspection is key to understanding the severity of any risks they may pose. Here’s a breakdown:
- Measure dimensions, note length, width and depth.
- Identify the exact location, proximity to load-bearing structures, and potential stressors.
- Direction: vertical, horizontal, diagonal?
- Shape: Can help tell us where it came from.
- Any evidence of movement? Gaps? Misalignment?
- Look for dampness around or in the cracks.
- Any nearby areas affected? Adjacent walls? Foundations?
In one case, a bridge had deep cracks in a support pillar. Wear and tear? Nope! Galvanic corrosion due to contact between different metals used in construction. Quickly identifying the issue allowed engineers to repair it before more damage happened.
Inspecting cracks requires expertise and an investigative mind. Details can uncover threats. Appropriate measures must be taken to protect the safety of those around.
Identifying the Severity
Assessing damage? It’s key to be precise. This will help figure out how bad the hit was, and how to bounce back.
A visual can help understand the levels. This table shows the different categories and what they mean:
| Severity | Description | Examples |
|---|---|---|
| Minor | Little damage, easy to fix | Scratches, small dents |
| Moderate | Visible damage that needs attention | Cracked windshield |
| Major | Big damage, affects functionality | Broken engine |
When considering other factors, know that assigning severity is subjective. Pro analysis and evaluation are important for correct identification.
And an example? In 2019, a town by the sea was hit hard by a storm. Houses were tagged with different colors based on their damage. This helped aid organizations decide who needed help most.
Preparing for Repair
To prepare for repairing a cracked foundation, gather the necessary tools and materials. Clear the work area by removing obstacles and ensure it’s ready for the repair.
Gathering the Necessary Tools and Materials
Gathering the essential tools and materials is a must for any repair project. Without them, your job can be tough and tedious. To ensure a smooth and efficient process, try these steps:
- Make a list: Before you start, make a checklist of everything you’ll need. This could include screwdrivers, pliers, wrenches, tape, parts and more. Writing it all down will stop multiple trips to the shop.
- Get your tools: Once you have your list, get the necessary tools and materials ready. Find them in your toolbox or buy what’s missing. Having them close by will reduce interruptions.
- Clear your workspace: Now that you have everything, it’s important to clear your workspace. Get rid of anything that might slow you down. Arrange your tools logically for easy access when you need them.
To make sure your project goes smoothly, double-check for the correct sizes and types of tools.
Back in 1927, gathering the necessary tools and materials was vital for the construction of a NYC skyscraper. The careful planning and coordination allowed workers to get their equipment quickly, leading to improved productivity and amazing success.
Removing Obstacles and Preparing the Work Area
Be sure to get rid of obstacles and prep the work area for any repair, for safety, efficiency, and easy access. Here’s a guide on how to do this effectively:
- Clear the space – remove any furniture, tools, or other items not related to the repair job.
- Gather the tools and materials needed and set them in a neat, available spot. This saves time and prevents wasting it on searches.
- Clean the area – dust, dirt, or debris can hinder the repair or harm delicate components. Vacuum or wipe down surfaces for this.
- Secure loose wires and cables – hazardous or obstructive wires can be sorted with cable ties or clips.
- Make sure the lighting is good – natural or artificial lights should be used to avoid mistakes.
Taking the time to prepare the work area before starting a repair is important, to save time, prevent accidents, and help the process be successful. Also, protective gear such as gloves, goggles, or masks is essential depending on the repair being done.
Did you know? In 2018, Occupational Medicine journal published a study saying inadequate prep of work areas leads to many accidents during repairs.
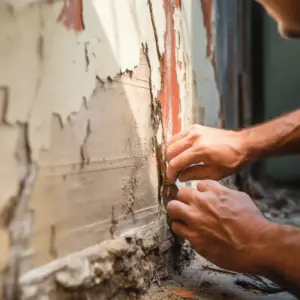
Repairing the Cracked Foundation
To repair a cracked foundation, address the issue by filling small cracks, reinforcing with steel or carbon fiber strips, and injecting epoxy or polyurethane resin. Each solution in this section of “Repairing the Cracked Foundation” tackles a specific problem, providing effective ways to restore stability and prevent further damage.
Filling Small Cracks
Small cracks in the foundation can lead to big problems if not fixed quickly. Here’s a guide on how to fix them:
- Check the size and depth of the crack. If it’s less than a quarter-inch wide and shallow, you can use epoxy or polyurethane injection to fill it.
- Use a wire brush or chisel to remove any dirt or loose debris from the crack. This will help the filler material stick better.
- Follow the manufacturer’s instructions to mix the epoxy or polyurethane. It usually involves combining two components to form a strong adhesive.
- Carefully insert the filler into the crack with a putty knife or trowel. Make sure to fill it without overfilling.
- Smooth out any excess filler with a putty knife or trowel. Make sure it’s level with the surrounding surface.
- Give sufficient time for the filler to dry and cure. Avoid putting any weight or pressure on it.
Filling cracks promptly prevents further damage and keeps your property’s foundation strong. Additionally, proper drainage systems help reduce future cracking risks.
Reinforcing with Steel or Carbon Fiber Strips
Let’s take a better look into how reinforcement works. Here is a table with an overview of the steps:
| Process Step | Description |
|---|---|
| Step 1 | Figure out the size and type of steel or carbon fiber strips you need, based on the cracks’ size. |
| Step 2 | Get the foundation surface ready by cleaning it and taking away any debris. |
| Step 3 | Put adhesive material on the cracks and attach the steel or carbon fiber strips to the surface. |
| Step 4 | Use extra layers of adhesive and strips to give extra strength across the whole crack area. |
| Step 5 | Wait for the adhesive to cure and bond with the strips, for a strong connection. |
Steel strips have higher tensile strength, but carbon fiber strips are more lightweight and resistant to corrosion. The decision between these two is based on factors such as budget, structural requirements, and preference.
Injecting Epoxy or Polyurethane Resin
Injecting epoxy or polyurethane resin is a common way to fix cracked foundations. This involves putting in a liquid into the cracks to fill and seal them, giving more stability.
Let’s check out this table:
| Column 1 | Column 2 |
|---|---|
| Materials Used | Epoxy Resin, Polyurethane Resin |
| Method | Injection into Cracks |
| Purpose | Fill and Seal Cracks |
| Benefits | Increased Stability |
| Application | Foundation Repair |
This has lots of advantages. The use of epoxy or polyurethane resins creates a strong bond, preventing more damage. Plus, they’re resistant to moisture and other environmental factors, making them longer-term solutions.
Don’t wait until it’s too late! Take care of any cracks right away before they cause more damage and cost you more. Protect your home and avoid future issues.
Finishing the Repair
To achieve a polished finish on your repaired foundation, follow this guide on finishing the repair process. Smooth and level the surface to ensure a seamless transition, then consider options like painting or sealing the patched area to protect against further damage.
Smoothing and Leveling the Surface
Smoothing and leveling the surface is a must-do in the repair process. This creates an even, flawless surface that blends in with the surrounding area for a professional finish. To get it right, follow these 3 steps:
- Prepare: Clean the area and remove any dust or dirt. Fill in any cracks or holes with the right filler material, then let it dry.
- Sand: Use sandpaper or a sanding block to remove high spots or excess filler. Sand in circular motions with light pressure.
- Check: Make sure the surface is level by using a straight edge across different areas. If there are low spots, apply more filler and repeat the sanding step.
Also, pay attention to details, like picking the right filler material and following manufacturer instructions. Self-leveling compounds can also be effective in leveling out uneven surfaces – according to DIY experts at Home Depot, they’re easy to use and create seamless results.
Painting or Sealing the Patched Area
- Prepare: Sand with fine-grit sandpaper and clean with a mild detergent and water solution. Let dry.
- Prime: Apply a thin coat of primer with a brush or roller. Cover patched area and small portion of surrounding area. Let dry.
- Paint/Seal: Choose a paint color that matches. Apply even coat with brush or roller. Blend with surrounding surface. Let dry.
- Finishing touches: Inspect for imperfections and sand if needed. Wipe away dust before applying another layer of paint if required.
Pro Tip: Use painter’s tape around the edges of the patched area for clean lines and to avoid painting onto adjacent surfaces.
Preventing Future Cracks
To prevent future cracks in your foundation, address underlying issues and prioritize regular maintenance and inspections. By delving into the sub-sections of addressing underlying issues and regular maintenance and inspections, you can find effective solutions to ensure the structural integrity of your foundation.
Addressing Underlying Issues
To stop cracks from happening again, it’s important to deal with their causes. Structure, materials, and expert views can be used to find hidden weaknesses. Knowing about these things gives us the power to protect ourselves in advance.
We need to take action to fix the real problems. Stability can be increased by making the foundations stronger, spreading the load, and using current materials. Working with engineers and architects makes sure that solutions are complete and can fix and protect weak places. Putting money into research and development helps crack-prevention tools even more.
Modern monitoring tools also add an extra layer of safety. Real-time data collection makes it easy to find problems quickly so that they can be fixed quickly. These methods make maintenance easier and cause the least amount of trouble for buildings and the people inside.
NIST did a study that showed that preventing cracks before they happen cuts fixing costs by a lot. This helps find problems earlier and stop them from getting so bad that they need expensive repairs or rebuilding.
To stop future cracks, it’s important to deal with the problems at the root. Structures can be kept safe and last a long time through thorough assessments, smart interventions, and constant monitoring.
Regular Maintenance and Inspections
Regular maintenance and inspections are essential to ward off cracks. These tasks guarantee the safety and longevity of structures. Here are four points to ponder:
- Inspect the building for any cracks or damages. Check walls, floors, ceilings and listen for any unusual noises or vibrations.
- Repair minor cracks right away. Use top-notch sealants or adhesives to fill in gaps and avoid more damage.
- Monitor environmental factors that can cause cracks, like temp changes and too much moisture. Install insulation and ensure proper ventilation.
- Get professional inspections by experienced engineers or contractors who specialize in structure integrity. They can detect any risks or areas that require attention, helping you take action before bigger problems arise.
Maintenance and inspections not just prevent future cracks, they also prolong the life of the structure. By promptly addressing small issues, you dodge pricey repairs down the line.
To make sure regular maintenance and inspections are successful, here are some tips:
- Draft a maintenance schedule tailored to your building’s needs. It should list tasks, frequencies and accountable people.
- Learn common causes of cracks in various structures and incorporate preventive measures as needed. For instance, if your building is prone to foundation problems, think about soil stabilization or deep foundation systems.
- Use advanced technologies like thermal imaging cameras or non-destructive testing methods during inspections for an extensive evaluation of the structure’s condition.
- Create a culture of proactive maintenance by encouraging reporting of any issues or concerns related to cracks in the building.
By following these tips, you can guarantee that regular maintenance and inspections avert potential crack formation, maximizing the lifespan of your structure and avoiding costly repairs in the future.
Conclusion
Wrapping it up, repairing a cracked foundation requires thoughtfulness and skillful know-how. By addressing the underlying causes, making the structure stronger and using the correct drainage solutions, homeowners can protect their house’s balance for years to come.
When fixing a cracked foundation, there are a few key points to keep in mind. Firstly, it is essential to discover the source of the problem. Whether it be soil erosion, too much moisture or bad construction methods, knowing the underlying issue will help the repair process go better.
After the cause has been located, strengthening the foundation is a must. This includes techniques such as setting up steel beams or piers for extra stability. Also, using good quality materials and following building regulations will make sure the outcome is long-lasting.
Another factor not to miss is taking care of any drainage issues near the foundation. Directing rainwater away from the house through downpipes, gutters and graded land will stop future cracks and damage.
To show the value of these steps, let’s look at a genuine example of a cracked foundation that was fixed successfully. In a suburban area with plentiful rainfall and clay soil which often causes foundation issues, one homeowner spotted big splits in their basement walls. They got professional help quickly and determined that bad drainage was the cause. By directing rainwater away from their home and reinforcing the harmed areas with carbon fiber strips, they were able to make their foundation’s strength permanent.
Frequently Asked Questions
Q1: What causes a cracked foundation?
A1: Cracked foundations can occur due to various factors such as soil settling, water accumulation, tree roots, or poor construction quality.
Q2: How can I identify a cracked foundation?
A2: Signs of a cracked foundation include visible cracks on walls or floors, uneven or sloping floors, doors or windows that stick, or gaps between walls and windows or doors.
Q3: Is it necessary to repair a cracked foundation?
A3: Yes, it is essential to repair a cracked foundation as neglecting it can lead to further structural damage, water leakage, or compromised safety.
Q4: Can I repair a small crack in the foundation myself?
A4: Small cracks can be repaired by homeowners using DIY foundation repair kits, but it is recommended to consult a professional for a thorough assessment and proper repairs.
Q5: How much does foundation repair cost?
A5: The cost of foundation repair varies depending on the extent of damage, the size of the crack, and the location. It is best to request estimates from multiple contractors for an accurate cost assessment.
Q6: How long does it take to repair a cracked foundation?
A6: The duration of foundation repair depends on the severity of the damage and the chosen repair method. It can range from a few days to several weeks. A professional contractor can provide a more accurate timeline based on the specific situation.