A cracked foundation can be a homeowner’s worst fear! Don’t panic, though. This article will guide you through the repair process. Here we go!
Identify the root cause of the cracks: settling soil, water damage or something else? Estimate the severity of the damage to decide which repair is suitable. There are two popular methods: injection crack repair and carbon fiber reinforcement.
Injection crack repair involves injecting epoxy or polyurethane into the cracks. Carbon fiber reinforcement includes applying carbon fiber strips to strengthen weak spots.
For bigger or complex issues, it’s best to get professional help. They have the experience and tools to make sure the repair is thorough and long-lasting.
Don’t wait to address a cracked foundation. Further damage and safety issues can result. Take quick action to protect your home.
Understand the causes, know the repair methods, consult professionals, and take immediate action. That’s how you keep your home strong and stable!
Table of Contents
Understanding the problem: What is a cracked foundation?
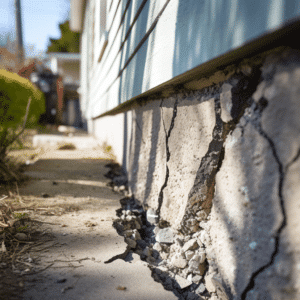
Cracks in a foundation can be cause for concern for homeowners. It’s key to understand the issue to repair it. These cracks may be due to many things, like settling soil, water problems, or bad construction.
The structure of the building weakens when cracks appear. They can range from tiny hairline fractures to bigger splits. It’s important to recognize what type of crack and its real source before attempting to fix it.
Different kinds of cracks can be found in a foundation. Vertical cracks are usually from settling and may be fixed easily. Horizontal cracks might be from soil pressure or water buildup.
To repair a cracked foundation, first determine why it cracked. This could include fixing drainage, stabilizing the soil, or sealing areas that are vulnerable. After the cause is taken care of, you can repair the crack with epoxy injections, polyurethane foam, or carbon fiber reinforcement.
It’s best to talk to a contractor experienced in foundation repair. They can accurately assess the situation and tell you the best solution. They will make sure the correct techniques and materials are used for long-lasting repairs.
Pro Tip: Check your foundation periodically for cracks and shifting. Early detection can help stop more damage and lower repair costs.
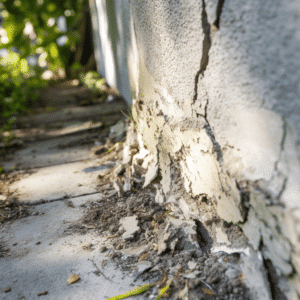
Assessing the damage: Signs of a cracked foundation
Small cracks in your home’s foundation can cause huge problems. Look out for these signs of damage:
- Walls or floors with widening or zigzag cracks.
- Doors and windows that don’t close properly.
- Floors that slope or are uneven.
- Gaps between walls and ceiling.
- Water leaking in basement or crawl space.
- Visible cracks outside.
Don’t ignore these signs! If left unaddressed, they can lead to serious issues. Also, the cause of the cracks can be different, such as soil movement, bad construction, or water damage. Knowing why can help you choose the best repair method.
This is proved by one homeowner who found a small crack in their foundation wall. They didn’t fix it and doors started sticking, with cracks widening throughout the house. It was due to a leaking underground pipe which caused soil erosion. After extensive repairs, their home was back to normal. It’s a reminder to act fast if you see any cracks in your foundation.
Safety precautions: Before starting the repair process
Prioritizing safety when repairing a cracked foundation is vital! Here’s how:
- Inspect the area first – check the damage.
- Wear protective gear – gloves, goggles, and a hard hat.
- Clear the surroundings – no tripping hazards!
- Stability is key – prop up unstable sections.
- Secure machinery and tools – check they’re working.
- Ventilate the workspace – don’t forget fumes!
Also, be mindful of nearby electrical lines when using heavy machinery or power tools.
A real-life incident serves as a reminder – a construction worker didn’t wear protective gear and was injured from flying debris. Emphasizing safety is essential!
Follow these steps and be aware of potential hazards. This will ensure a secure environment for yourself and others working on your cracked foundation!
Step 1: Identifying the cause of the crack
Figuring out the cause of a crack in your foundation is key for successful repairs. Knowing what caused it ensures that any fixes you do will last.
- Look Closely: Inspect the crack and the area around it. Check for signs of damage or movement, like bulging walls or spaces between materials. This can help you narrow down why it happened, like from soil settling or hydrostatic pressure.
- Ask an Expert: If you’re not sure or need a professional opinion, contact a foundation repair specialist. They can analyze the crack and offer insights on the cause.
- Consider the Environment: Think about environmental factors that may have caused the crack. For example, too much water from heavy rain or bad drainage can put pressure on the foundation and cause cracks. Understanding these factors can help you address the issue and stop it from happening again.
Remember, understanding the cause is vital for fixing the problem properly and avoiding future damage. Take your time and look over everything before starting repairs.
Pro Tip: Keep notes and possibly photos of what you see in Step 1. This documentation can help you explain your findings to experts or contractors later.
Step 2: Evaluating the severity of the crack
Assessing the gravity of a fractured foundation is essential for successful repair. Here’s a three-step guide to help you evaluate the scope and seriousness of the crack:
- Visual Check: Take a close look at the fracture, noting its location, width, and length. Make photos or draw a diagram to document your findings. Look for any signs of movement or displacement.
- Measurement: Use a ruler or measuring tape to measure the width and depth of the fracture. This will show you how much it has grown or diminished over time. Note any changes in size along different parts of the crack.
- Consult Professional: If you’re unsure about the severity of the fracture, it’s best to get expert advice from a structural engineer or foundation specialist. They can use specialized tools and techniques to properly judge the condition and suggest suitable repairs.
Moreover, consider other factors like moisture levels, adjacent cracks, and any visible harm to surrounding structures that could influence the overall assessment of severity.
Knowing how serious a cracked foundation is is imperative for effective repair planning and preventing further damage. With these steps, you’ll have the necessary data to make informed decisions about repairing your foundation.
True Story: One homeowner found a slight vertical crack in their basement wall but neglected it for ages, thinking it was insignificant. When they eventually decided to assess it, they discovered that it had expanded drastically and undermined the stability of the entire foundation. Prompt action was necessary to ensure their safety and avoid costly repairs down the line.
Step 3: Gathering necessary tools and materials
Gather safety gear like gloves, goggles, and a dust mask. Collect tools like a sledgehammer, chisel, drill, and level. Get high-quality supplies like hydraulic cement, epoxy resin, and injection ports. Obtain extra materials like wire mesh and rebar.
Also, check local regulations. Do you need permits or inspections? Make arrangements beforehand.
Start the repair process! Gather what you need for a successful repair. Secure your home’s foundation with strong and stable support. Take action now to prevent more damage.
Step 4: Preparing the crack for repair
Preparing a crack for repair involves five significant steps. A 5-step guide:
- Clean the area. Use a wire brush and vacuum to get rid of loose debris, dirt, or dust.
- Take out loose material. Inspect the crack for crumbling material. Use a chisel or scraping tool carefully to remove.
- Put on a primer. For better adhesion and bonding between existing concrete and repair material, apply primer.
- Fill the crack. After primer dries, put in epoxy or polyurethane-based sealants. Follow manufacturer instructions.
- Level the surface. With a putty knife or trowel, smooth and level. Make sure no air pockets.
Allow drying time before any load or stress.
A couple faced cracks in foundation during renovation. They asked an experienced contractor who gave advice and helped them repair the cracked foundation. Following expert advice, they succeeded in restoring the home’s stability. Proper preparation is key to a solid foundation!
Step 5: Choosing the appropriate repair method
Choosing the right repair method for a cracked foundation is key to a successful, long-lasting fix. Here’s a step-by-step guide to help you choose wisely:
- Assess the crack’s severity: Look at the size, location, and direction of the crack. This will tell you how extensive it is and its potential impacts.
- Consult an expert: Get help from a structural engineer or foundation specialist who can offer the best repair option based on your situation.
- Figure out the cause: What caused the crack? Was it soil settlement, water damage, or a structural issue? You must address this root cause to avoid more cracks in the future.
- Compare repair methods: Research and compare epoxy injection, carbon fiber reinforcement, and underpinning. Each one has pros and cons, so pick one that works with your needs and budget.
- Get multiple quotes: Ask for quotes from reliable foundation repair experts. Compare pricing, expertise, and reviews before making your decision.
- Prioritize durability: Cost matters, but quality and long-term durability should be your priority. A well-done repair using quality materials will keep your foundation stable for years.
Remember, every foundation repair project is unique. Seek advice from the pros to get the best approach for your circumstances.
Diane had to grapple with her own cracked foundation. After researching and consulting experts, she opted for carbon fiber reinforcement. It was strong and flexible enough to prevent further cracking. And, it worked! Her foundation has been stable since.
Step 6: Executing the repair
Time to fix that crack in the foundation? Here are the steps:
- Check the width and length of the crack.
- Clean it and get out any debris.
- Squirt in epoxy or polyurethane to seal it.
- Let the material cure per instructions.
Don’t wait – a crack can get worse quickly. Pro Tip: If you’re not sure what to do, ask a pro contractor or engineer.
Step 7: Monitoring and post-repair maintenance
It’s essential to monitor and maintain your repaired foundation for long-term stability. Here’s what you can do:
- Inspect regularly for signs of cracks, shifting, and moisture.
- Ensure proper drainage around your property.
- Control humidity levels with dehumidifiers or vents.
- Address small cracks quickly.
- Don’t make changes without consulting an expert.
- Have professionals inspect periodically.
A family in my hometown found a crack in their basement wall after moving in. They followed all maintenance guidelines but noticed movement in the crack during heavy rain. An expert identified an issue with the nearby drainage system that was causing water accumulation. They took action to fix it and stabilized their foundation.
Taking proactive measures is key to keeping your home safe and secure. Pay attention to even minor issues, as they can cause major damage if ignored.
Conclusion
It’s clear: fixing a cracked foundation needs thought and expert help. Homeowners can fix it by following the necessary steps and using proper materials.
Identifying the reason why the crack happened is essential. It could be water damage, structural issues, or soil movement. Knowing the cause helps you choose the right repair method.
Repairing a crack includes multiple steps. Start by cleaning and removing loose debris and existing cracks. Depending on the severity of the crack, you may need epoxy injections or carbon fiber strips. A professional should help you decide the best way for your foundation.
Here’s a true story. A couple in Oregon noticed cracks in their basement walls. They contacted a foundation repair company. Water damage caused significant damage to their foundation. The experts fixed it with sealant injections and waterproofing measures. Now they can relax knowing their home’s structure is secure.
Frequently Asked Questions
Q: What are the common signs of a cracked foundation?
A: Common signs of a cracked foundation include cracks in the walls or floors, doors and windows that stick or are difficult to open and close, uneven or sloping floors, and gaps between walls or floors and the ceiling.
Q: Can I repair a cracked foundation myself?
A: It is recommended to hire a professional for foundation repairs as they have the expertise and equipment to properly assess and fix the issue. DIY repairs could be ineffective or even worsen the problem if not done correctly.
Q: How much does foundation repair cost?
A: The cost of foundation repair can vary depending on the extent of the damage, the size of the property, and the location. It is best to get a professional assessment and quote to determine the exact cost.
Q: What are the common methods used to repair a cracked foundation?
A: Common methods to repair a cracked foundation include epoxy injections, carbon fiber reinforcement, foundation underpinning, and hydraulic piers. The appropriate method will depend on the specific circumstances and severity of the crack.
Q: How long does it take to repair a cracked foundation?
A: The duration of foundation repair can vary depending on the complexity of the problem and the chosen repair method. Minor cracks may be fixed in a few days, while more extensive repairs could take several weeks.
Q: Can foundation cracks be prevented?
A: While it’s not always possible to completely prevent foundation cracks, there are measures that can reduce the risk. Proper moisture control, regular inspection, and maintenance of drainage systems around the property can help minimize the chances of foundation cracks.