Renovating a bathroom? No sweat! Here’s a guide to help you transform your dated space into a luxe oasis.
First, consider the design and layout. Think about how you want to use the space. Want a big tub or spacious shower? Double sinks or extra storage? Analyze your needs to create a plan that fits your lifestyle.
Next, choose materials and finishes. Tiles, countertops, faucets, lighting fixtures: endless options. Keep in mind factors like durability and style. Mix and match textures and patterns for a unique look.
For complex tasks, hire professionals. They’ll handle plumbing, electrical work and carpentry. Plus, they’ll save you time and reduce stress.
Pro Tip: Don’t forget ventilation. Install an exhaust fan or windows to prevent moisture build-up and mold growth.
When you’re done, you’ll have a stylish and functional bathroom. Attention to detail is key, so take your time. Soon, you’ll have a space that increases the value and appeal of your home.
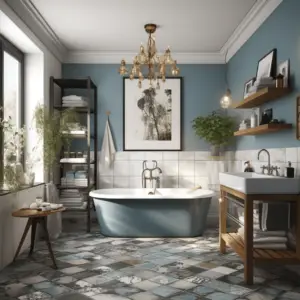
Table of Contents
Assessing the current bathroom condition
Assessing the current state of your bathroom is crucial before starting any renovation project. Consider the following points:
- Evaluate the overall condition: Examine the walls, flooring, fixtures, and plumbing to identify any damages, leaks, or signs of wear and tear.
- Check for functionality: Assess if the existing layout and design of the bathroom meet your needs and if there are any issues with the existing systems such as ventilation or lighting.
- Consider the aesthetic appeal: Determine if the current style and decor of the bathroom align with your preferences. Identify any outdated elements or features that you would like to change.
- Assess the space: Measure the dimensions of the bathroom to determine if it adequately meets your storage and usability requirements. Consider if there is a need for additional space or if rearranging fixtures would optimize the layout.
It’s important to note that a proper assessment will help identify the scope of work required and enable you to plan and budget for the renovation accordingly. Keep in mind that every bathroom is different, and assessing its unique details is crucial in ensuring a successful and personalized renovation.
In a similar vein, a friend of mine decided to renovate her bathroom. Upon assessing the current condition, she discovered a hidden leak that had caused significant damage to the walls and flooring. This unexpected discovery emphasized the importance of a thorough assessment before diving into a renovation project.
Who needs space when you can enjoy the exhilarating experience of knocking your elbows on every surface in your bathroom?
Evaluating the layout and functionality
Analyzing a bathroom’s layout and functionality involves assessing various aspects. Placing key components like the sink, toilet, and shower/bathtub is important. Evaluating storage options such as cabinets or shelves is essential for organizing essentials.
Here are 3 columns to consider when evaluating a bathroom’s layout and functionality:
- Column 1: Fixtures Placement
- – Where is the sink? Is there enough counter space?
- – Where is the toilet? Is there enough legroom?
- – Where is the shower/bathtub? Any restrictions due to surrounding structures?
- Column 2: Storage Solutions
- – Are there enough cabinets?
- – Are there shelves/racks for displaying items or holding soap/shampoo?
- – Does the bathroom offer built-in niches or compartments?
- Column 3: Accessibility
- – Are there grab bars for safety?
- – Is the counter at a comfortable height?
- – Is there ample lighting throughout?
Analyzing these factors helps us understand the bathroom’s effectiveness. Unique details such as eco-friendly fixtures and innovative design features can further enhance its functionality.
Throughout history, evaluating bathroom layouts has been essential. From ancient civilizations building communal bathhouses to modern times where architectural principles are considered, the evaluation of bathroom layouts is crucial for user satisfaction.
Inspecting plumbing and electrical systems
To inspect plumbing and electrical systems effectively, take these five steps:
- Check for leaks. Look out for signs of water leakage from pipes, faucets, or toilets. These could be dampness, mold growth, or water stains. Fix any leaks right away to stop further damage.
- Test the water pressure. Turn on the faucets and showers to see the pressure. Low pressure could mean clogged pipes or other problems. High pressure can strain the system and may cause leaks.
- Examine electrical outlets. See if any connections are loose, damaged, or discolored, or if there is a burning smell. Ensure the outlets are grounded and working well.
- Test switches and fixtures. Turn on light switches, fans, exhaust systems, and other fixtures to make sure they’re working properly. Replace any faulty ones to keep them functional.
- Review safety measures. Make sure GFCI (Ground Fault Circuit Interrupter) outlets are installed near water sources like sinks and showers as per building codes. These protect against electric shock hazards.
It’s essential to maintain plumbing and electrical systems regularly to make them last and work well. Get qualified professionals to inspect them periodically. They can spot potential issues before they become bigger.
For example, a homeowner didn’t check their bathroom’s plumbing system often. Then one day, a hidden pipe burst while they were in the shower, causing lots of water damage throughout the house. Inspections and repairs on time would’ve prevented this.
In conclusion, inspecting plumbing and electrical systems in bathrooms is critical for functionality, safety, and avoiding costly repairs. By following the steps and inspecting regularly, homeowners can keep bathrooms in great condition and avoid unexpected issues.
Identifying any structural issues
To assess the current bathroom condition, we must identify any structural issues. To keep the space safe and functional, we can create a table. It will help us document any concerns in an organised way.
The table includes columns such as “Area”, “Issue”, “Severity”, and “Recommended Action”. In the “Area” column, we can list potential problems like walls, floor, ceiling, plumbing fixtures, and electrical outlets. In the “Issue” column, we note specific issues like cracks or leaks. We can rate the severity of each issue in the corresponding column. Lastly, we suggest solutions in the “Recommended Action” column.
We must also consider hidden signs of damage like water behind walls or weak spots in older plumbing systems. This attention to detail allows for a comprehensive evaluation of the bathroom condition.
To address these issues, we can repair cracks and leaks. We can also reinforce weak spots and upgrade old plumbing systems. Repairing cracks and leaks preserves walls and reduces deterioration. Reinforcing weak spots adds stability and prevents accidents or future repairs. Upgrading plumbing systems improves functionality and prevents costly emergencies.
By following these suggestions and regularly assessing for structural issues, we can ensure our bathroom stays safe, functional, and visually appealing. Proactive measures promote physical and psychological well-being in our homes.
Creating a renovation budget
A renovation budget is an essential aspect of any bathroom renovation project. Without a well-planned budget, you may end up overspending or compromising on the quality of materials and workmanship. To ensure a successful renovation, here are six crucial points to consider when creating your budget:
Assess Your Finances:
Start by evaluating your financial situation and determining how much you can allocate for the renovation. Take into account your savings, available credit, and any expected additional funds.
Prioritize Your Needs:
Identify the key elements that require attention in your bathroom remodel. Decide on must-have items, such as fixtures, tiles, and plumbing updates, and prioritize them in your budget to prevent overspending on less essential aspects.
Research Costs:
Research and gather information on the average costs of the materials and services you will need for your renovation. Consider obtaining multiple quotes from different suppliers and contractors to ensure you’re getting the best prices.
Factor in Labor and Professional Fees:
Don’t forget to include labor costs and professional fees in your budget. Whether you’re hiring a contractor, plumber, or electrician, getting estimates for their services is crucial for accurate budgeting.
Account for Unexpected Expenses:
It’s important to set aside a contingency fund in case unexpected expenses arise during your renovation. Leave room in your budget for unforeseen structural issues, hidden damages, or necessary changes in design or materials.
Track Expenses and Adjust:
Throughout the renovation process, keep track of all your expenses and compare them against your budgeted amounts. Adjust your spending as needed to stay within your allocated budget.
Additionally, it’s crucial to note that renovation budgets can vary greatly depending on the extent of the project and the desired level of quality and finishes. Each bathroom renovation is unique, so it’s essential to account for your specific requirements and follow these budgeting principles accordingly.
In a similar pursuit for a budget-friendly bathroom renovation, Jane, a homeowner in need of a bathroom transformation, diligently followed the above steps. She carefully evaluated her finances, prioritized her needs, and obtained multiple quotes for materials and services. By tracking her expenses and making adjustments, Jane successfully completed her bathroom renovation within her allocated budget, showcasing the importance of effective budgeting in achieving a satisfactory outcome.
The only thing scarier than renovating a bathroom is realizing that after all your hard work, it’s still the room where you have to go to do your business.
Determining the scope of the renovation
It’s essential to think about elements that are unique to your situation. To make the process simpler, consult with professionals, check out comparable projects, and get multiple quotes. Taking the time to figure out the scope of your project will help keep it on track and in budget.
Define your needs and objectives. What do you hope to achieve with the renovation? Have a vision to guide your decisions.
Evaluate the space: Look at the current condition of the space, such as structure, plumbing, electrical systems, and other components.
Consider aesthetic changes. Change the look and feel of the space by selecting paint, flooring, and cabinetry that fits your aesthetic.
Prioritize renovations. Identify which areas must be taken care of right away and which can be addressed later.
Budget constraints. Know how much you’re willing to spend on the renovation. Take into account materials, labor costs, permits, and unexpected expenses.
Timeline considerations. Decide when to start and finish the project. Consider events or dates that could affect the timeline.
Researching and estimating costs
Take a closer peek at the different aspects of your renovation project’s cost estimation research.
- Materials: $5,000. Includes lumber, concrete, tiles, fixtures, etc. Research to get the best deals, but maintain quality.
- Labor: $7,500. Hiring professionals like contractors or electricians. Get multiple quotes and compare them.
- Permits: $1,000. Depending on the location and scope, local authorities may need permits. Research permit requirements and fees.
- Design Fees: $2,000. If working with an architect or interior designer, consider their fees. Research their work and consult with them to understand their pricing.
- Contingency: $3,500. Set aside a portion of the budget for unexpected expenses. This buffer ensures you won’t go over budget.
Setting a realistic budget
Prioritize what’s important to you – focus on the areas that need most attention and dedicate your budget to them.
Research expenses – take time to find out prices for materials, labor and extra costs such as permits or design fees.
Build a contingency fund for unexpected costs, 10-20% of the total.
Get multiple quotes – compare prices and services to get the best deal.
Consider value in the long run – higher quality products lead to lower maintenance costs.
In conclusion, plan ahead with a realistic budget – prioritize, research, set aside a contingency fund, get quotes and consider long-term value to ensure success and stay within budget.
Designing the new bathroom
Designing the new bathroom is an intricate task that requires careful planning and attention to detail. To create a beautiful and functional space, consider the following points:
- Choose a cohesive design scheme: Select a style and color palette that will tie together all elements of the bathroom, such as tiles, fixtures, and accessories.
- Optimize space utilization: Analyze the available space and strategically plan the placement of fixtures, storage options, and other essential elements to maximize functionality.
- Incorporate efficient lighting: Consider both natural and artificial lighting sources to create a well-lit and visually appealing ambiance. Install fixtures strategically to eliminate shadows and provide adequate illumination.
- Select durable and water-resistant materials: As the bathroom is exposed to moisture regularly, opt for materials that are resistant to water damage and easy to maintain. Choose tiles, countertops, and bathroom fixtures that are not only visually appealing but also built to withstand the effects of moisture.
In addition to these considerations, it is essential to personalize your bathroom based on your unique preferences and needs. Pay attention to small details like towel racks, mirrors, and bathroom accessories, which can add character and functionality to the space.
A true story that exemplifies the importance of designing the new bathroom involves a couple who recently renovated their outdated bathroom. Frustrated with the lack of storage and the dated design, they sought professional help in redesigning the space. With the guidance of an interior designer, they were able to create a modern and functional bathroom that met their needs. The couple was impressed with how the new design transformed their daily routines and enhanced their overall bathroom experience.
Looking for bathroom inspiration? Just remember, a bathroom renovation is like a good relationship – both require a lot of plumbing and an endless supply of patience.
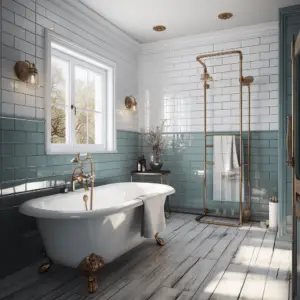
Gathering inspiration and ideas
Browse magazines and websites for interior design ideas. Look at colors, materials, and layouts. Visit showrooms or home improvement stores to see bathroom displays. Get inspired by nature, art, and favorite travel spots. Colors, textures, and patterns should bring calm. Think about size and layout of your bathroom. Note clever storage solutions and innovative designs.
Did you know? The National Kitchen & Bath Association offers webinars and workshops on bathroom design. Useful for trends and best practices from industry pros.
Planning the layout and spatial arrangement
- Start by measuring the bathroom and seeing what you’re limited to.
- Identify key elements like the shower, toilet, vanity, etc, and prioritize them based on needs and wants.
- Make sure the fixtures don’t obstruct movement and there’s room to move around.
- Use natural light to create a bright atmosphere.
- Energy-efficient fixtures can reduce water consumption.
- Smart technologies like motion-sensor lighting can be convenient.
- Utilize vertical spaces for shelves or cabinets to declutter.
- Follow these steps to make your bathroom reflect your style while being practical.
- Planning is key for a harmonious balance between aesthetic and practicality.
Selecting materials, fixtures, and finishes
Careful selection of materials, fixtures, and finishes is key to a successful bathroom design. Each element contributes to the overall look and purpose of the space. Here’s what you need to know when making your selections:
- Match it to your home: Choose materials, fixtures, and finishes that suit the style of your house. This will create a harmonious look.
- Prioritize practicality: Opt for fixtures that are easy to use and maintain.
- Think long term: Balance current trends with timeless appeal to ensure your bathroom design remains relevant.
Time taken to make the right choices pays off: you’ll have a bathroom that meets your needs and increases the value of your home.
Hiring professionals or DIY renovation
When deciding between hiring professionals or opting for a do-it-yourself renovation, there are key factors to consider.
- Expertise: Professionals possess the necessary skills and experience to handle intricate tasks, ensuring a high-quality outcome.
- Time and effort: DIY renovation requires a significant commitment of time, as it involves planning, sourcing materials, and completing the actual work.
- Budget: Hiring professionals may be costlier upfront, but they can help avoid potential mistakes and costly repairs in the long run.
- Complexity: The decision between DIY and professionals may also depend on the complexity of the renovation project. More intricate tasks may require professional assistance.
Additionally, seeking professional advice and obtaining permits, if necessary, can provide insights and ensure the renovation adheres to building codes and regulations.
In terms of unique details, it is crucial to consider the availability of resources such as time, budget, and skills. These factors will help determine whether hiring professionals or opting for a DIY renovation is the most suitable choice.
A true fact to note is that according to a survey conducted by Houzz, approximately 87% of homeowners hire professionals for their bathroom renovations, citing the desire for a professional finish and ensuring the project’s success.
Renovating a bathroom: where your dreams of an HGTV-worthy oasis meet the reality of cursing under your breath while attempting to install a toilet.
Deciding whether to hire a contractor or do it yourself
Budget: Hiring professionals might cost you, but they often have discounts and can save you in the long-term. DIY may seem cheaper, but extra expenses can quickly add up.
Time and Expertise: Pros have years of experience and knowledge. They can finish work quickly to a good standard, saving you time and stress. But, if you have the right skills and like hands-on projects, DIY can be fun.
Quality and Safety: Professionals stick to codes and regulations for top quality and safety. They have tools and materials that are not usually available to homeowners. Without proper knowledge, DIY can compromise safety or result in substandard results.
Think about project complexity and your preferences before making your decision. Hiring a professional means no worries and no regrets. Don’t let fear of poor results lead to hasty decisions. Choose wisely depending on your needs and circumstances.
Obtaining necessary permits and permissions
Obtaining necessary permits and permissions is an essential part of any home renovation. It must be done to ensure compliance with local regulations and building codes. Not doing so can lead to fines and delays.
To make the process easier, consider hiring a professional with experience in local regulations. They can help design renovations that meet standards from the start and save time on revisions or rejections.
If you decide to DIY, research and understand all regulations. Get the required documents ready and follow up on the progress of your application.
Here are some tips to keep in mind:
- Research local regulations.
- Contact the relevant authorities.
- Gather documentation.
- Follow guidelines and regulations.
- Stay organized.
Be aware that there may be specific timelines and requirements based on property size or location. But, with the right preparation and effort, you can ensure a successful renovation and a hassle-free journey.
Choosing reputable professionals or suppliers
Do your research. Compare different professionals or suppliers – check their reputation and credibility.
Look for reviews and testimonials from previous clients.
Check for licenses, certifications and insurance policies.
See their portfolio. Does their style fit your vision?
Evaluate how well they communicate. Clear communication is key.
Plus, ask about warranties or guarantees. Availability and timeline, too.
Be warned: a small town neglected research and paid for it. Poor quality materials, costly repairs. Reputable professionals or suppliers are vital for success.
Preparing for the renovation
To get ready for the renovation process, there are a few important steps you should consider:
- Ensure you have a detailed plan in place that includes the desired design and materials.
- Make sure you have all the necessary permits and approvals for any structural changes involved.
- Set a budget and have a clear timeline for the project.
These steps will help ensure a smooth and successful renovation process.
In addition to these steps, it’s important to consider any unique details of your specific renovation project. For example, if you live in an older building, you may need to account for potential asbestos or lead paint. Alternatively, you may need to work around existing plumbing or electrical fixtures. By considering these unique elements, you can plan and prepare accordingly.
A homeowner named Sarah recently renovated her bathroom using these steps. She carefully planned the design and materials, ensuring they matched her vision for a modern and functional space. Sarah obtained the necessary permits and approvals, ensuring her renovation met all the required regulations. By setting a budget and timeline, she was able to stay on track and complete the project within her desired timeframe. Sarah’s bathroom renovation turned out beautifully, and she is thrilled with the final result.
Say goodbye to your porcelain throne and clear out the bathroom’s personal items, because there’s no room for sentimentality when you’re knee-deep in bathroom renovations – unless you collect mold, then it’s a different story.
Clearing the bathroom of personal items and furniture
Be sure to remove all personal items, like towels and decorations, from the bathroom. Furniture that isn’t attached to the walls, like cabinets and shelves, must be removed too. Empty out the vanity drawers. Cover bathroom fixtures, like sinks and toilets, with protective materials. It’s also wise to find storage for your items while the renovation is ongoing. Make sure you communicate any specific instructions to the renovation team. Don’t forget to clear your bathroom before beginning the project! Get ready and guard your belongings.
Protecting surrounding areas from dust and debris
Protecting against dust and debris during a renovation is essential! Plastic sheets, tarps, and drop cloths can be used to cover furniture, floors, walls, windows, and other surfaces. Furthermore, sealing off vents and ducts helps to prevent particles from circulating throughout the building. A designated path should be created for workers to enter and exit the project area, which also minimizes the spread of dust and debris. Additionally, regular cleaning sessions are necessary to maintain a clean and safe environment.
Emphasizing the importance of keeping the area clean is important to communicate with contractors and workers involved in the project. During one particular renovation, diligent measures were taken to protect the area from dust and debris. As a result, the client was impressed with the attention to detail and appreciated that their home stayed clean despite the demolition work.
Prioritizing protection against dust and debris during renovations can lead to a successful project timeline while keeping your surroundings safe and clean!
Disconnecting utilities if required
Switch off the main water supply near the meter or in the basement. Open the faucets to expel any pressure. Safety first!
Turn off the main power switch or circuit breakers. Unplug all appliances and electronics.
Shut off the main gas valve at the meter and make sure pilot lights are off.
Contact a service provider to suspend internet/phone/cable services.
Make sure other utilities like sewer lines, heating systems, and ventilation units are disconnected.
Don’t forget to: drain waterlines, empty fuel tanks, and secure exposed wires!
It’s a must to learn from past experiences and follow proper guidelines to dodge potential harm during renovations.
Demolition and remodeling
Demolition and remodeling, also known as renovation, involves the reconstruction and transformation of a bathroom space. Firstly, removal of existing fixtures, walls, and flooring is done to create a blank canvas. Secondly, the bathroom is redesigned and modernized according to the desired style and functionality. This may include installing new plumbing systems, fixtures, tiles, and lighting. Lastly, finishing touches such as painting, adding accessories, and ensuring proper ventilation complete the renovation. It is important to hire professionals to ensure safety and quality workmanship throughout the process.
Renovating a bathroom is like a messy breakup – you need to remove all the old fixtures, tiles, and materials before you can even think about moving on.
Removing old fixtures, tiles, and materials
Safety is key! Wear protective goggles, gloves, and masks. Disconnect any electrical or plumbing connections linked to the fixtures. Use a crowbar or wrench to loosen screws or nails. Chisel and hammer the edges of tiles inward to carefully remove them. Cut drywall and flooring into sections before removal. Dispose of old fixtures, tiles, and materials by recycling or hiring a waste disposal service.
It’s important to note that different fixtures require specific techniques for removal. For example, a bathtub might involve disconnecting pipes and loosening bolts underneath. Knowing the intricacies of each fixture makes demolition smoother.
An experienced contractor faced unexpected challenges while remodeling an old bathroom. The original tiles had been installed with a strong adhesive. It took hours to remove tiles without causing damage, teaching the contractor the importance of adaptability and problem-solving.
Successful demolition and remodeling requires mastering the art of removing old fixtures, tiles, and materials. Follow the steps and be prepared for obstacles to transform any space!
Repairing or improving the plumbing and electrical systems
Regular inspections? A must! Check your plumbing and electricals often to spot any issues before they become big problems. Leaks? Fix ’em fast! Leaks can cause water damage and mold. Upgrade outdated wiring– it’s a safety hazard and won’t work with modern appliances. Get a pro for complex repairs and use only high-quality materials.
Differentiating plumbing from electrical repairs? Water pressure, drainage, and pipe material for the former. Circuitry, load capacity, and safety protocols for the latter.
Planning is key! Before any repair/improvement project, figure out costs, timeframes, and permits. Find qualified contractors with great reviews and licenses. And don’t forget to stay connected with the contractor throughout the project.
Following these suggestions will not only boost your home’s functionality but value too. Plus, keep it safe and livable for you and your family!
Installing new fixtures, tiles, and finishes
- First, get rid of any existing fixtures, tiles, or finishes. This will give you a clean slate.
- Measure the area where you plan to install the new items, and make sure it’s accurate.
- Prepare the surface by cleaning it and making sure it’s level and smooth. This will provide the best foundation for the new materials.
- Install the fixtures, tiles, or finishes according to the manufacturer’s instructions. Use the right tools and techniques for a secure and professional-looking result.
- Let the adhesives or grout set and dry before using the newly installed features.
- Admire your handiwork! You’ve transformed the space with fresh fixtures, tiles, or finishes.
- Think about color schemes, design elements, and maintenance requirements when selecting the new items.
- Certain installations may require special knowledge or tools, so it might be best to get help from professionals.
- Make sure to take advantage of these opportunities to bring new life into your home.
Finishing touches and final inspections
In the final stages of renovating a bathroom, attention to detail and thorough inspections are crucial. Ensure every aspect is properly finished and meticulously inspected before considering the project complete. Here is a step-by-step guide to assist you in achieving the desired results:
- Hardware installation: Attach the finishing touches such as faucets, towel racks, and cabinet knobs. Ensure they are securely fastened and aligned correctly.
- Lighting fixtures: Install and test all lighting elements. Check for proper functionality and ensure they provide adequate illumination throughout the space.
- Bathroom accessories: Place items like soap dispensers, shower curtains, and toilet paper holders. Ensure that they are properly positioned and well-coordinated with the overall design.
- Final paint touch-ups: Inspect the painted surfaces for any imperfections or inconsistencies. Touch up any areas that require attention, ensuring a smooth and uniform finish.
- Flooring and tile inspection: Thoroughly examine the flooring and tiles to verify that they are properly installed and level. Check for any cracks, gaps, or loose tiles and address them promptly.
- Plumbing and electrical checks: Perform a comprehensive inspection of the plumbing and electrical systems. Test all fixtures, faucets, and outlets to ensure proper functioning and safety.
Additionally, consider smaller details that may have been overlooked, such as grout lines, caulk application, and overall cleanliness. Pay attention to each element, ensuring they blend seamlessly to create a cohesive and aesthetically pleasing bathroom space.
Pro Tip: Before making any final decisions, invite someone with a fresh perspective to inspect the completed bathroom. They may notice details or imperfections that you missed during the renovation process.
If you choose the wrong color for your bathroom walls, you might end up feeling like you’re trapped inside a clown car every time you enter.
Painting walls and ceilings
- Prep the area: Before painting, make sure the walls and ceilings are clean, dry, and dust-free. Wipe surfaces with a damp cloth. Cover furniture and floors with drop cloths or plastic sheets.
- Apply primer: Use a roller or brush to apply a thin layer of primer. Let it dry before continuing.
- Paint with precision: Start by cutting in along edges with a brush. Then, use a roller for larger areas. Work in sections and avoid visible brush strokes.
- For unique painting, try color blocking or stenciling. Experiment with colors that complement each other. Or, create an accent wall for a bold statement.
An example of a painting transformation: A dull living room was transformed by pastel shades on the walls and pops of color through artwork. Friends and family were shocked to see the difference!
Installing accessories and storage solutions
- Evaluate your needs. Consider the type and amount of items, accessibility, and aesthetics. This helps decide the right accessories.
- Pick accessories that fit and complement the space. Hooks, racks, dividers, baskets, and drawer organizers make sense. Ensure they are strong.
- Plot the layout. Measure the space and arrange it to get the most out of storage. Take into account reach and visibility.
- Install the accessories. Stick to the manufacturer’s guidelines. Use the right tools and techniques to avoid damaging surfaces.
- Test the functionality. Put items in their designated spaces and check if they meet your expectations.
In addition, make use of vertical space with overhead racks or wall-mounted units. It adds value to your home and keeps the floor area free.
Follow these steps and you can have a functional and organized space with accessories and storage solutions. Get creative and turn any area into a neat haven.
Performing thorough checks and inspections
Look for defects or irregularities that require further inspection. Test components and systems to ensure they’re working properly. Assess the integrity of walls, floors, ceilings, and other structural elements. Check for cracks, signs of decay, and safety hazards.
Ensure the project meets building codes and regulations. Fire safety, accessibility, and industry standards must be met. Review permits, contracts, and paperwork to check accuracy and completeness. Do a final walkthrough to look for outstanding issues.
Pay attention to minor details that could affect quality. Thoroughness is key. Consider hiring a third-party inspector for an unbiased assessment. This can provide valuable insights and help fix overlooked issues.
Cleaning up and enjoying the new bathroom
Savor the pristine beauty and functionality of your newly renovated bathroom by following these four steps:
- Tidy Up: Begin by thoroughly cleaning every surface of your new bathroom, using appropriate cleaning products and tools. Ensure all fixtures, tiles, and countertops are spotless, creating a fresh and inviting space.
- Organize and Accessories: Arrange your bathroom essentials in a way that maximizes convenience and aesthetics. Utilize storage solutions to keep toiletries neat and easily accessible. Add tasteful accessories such as plants or artwork to enhance the ambiance of the room.
- Indulge in Self-Care: Transform your bathroom into a personal sanctuary by incorporating elements that promote relaxation and tranquility. Consider adding scented candles, soft towels, or a luxurious bath mat to create a spa-like atmosphere, allowing you to unwind and recharge after a long day.
- Harness Natural Light: Make the most of natural light, if available, by positioning mirrors strategically to reflect sunlight throughout the space. This not only brightens the room but also creates an illusion of spaciousness, making your bathroom feel more inviting and refreshing.
To maintain the elegance and functionality of your new bathroom, remember to regularly clean and declutter the space. A well-maintained bathroom not only offers daily convenience but also becomes a sanctuary for relaxation and rejuvenation.
Pro Tip: Consider investing in quality cleaning tools and products specifically designed for bathrooms. This will help you effectively remove stubborn stains and maintain the pristine condition of your newly renovated space.
Removing construction debris is like a therapy session for your bathroom – you’re just tearing down walls together and getting rid of all the emotional baggage.
Removing construction debris
Steps: Gather all the construction waste in one spot.
- Use big trash bags and strong containers to store and transport the debris securely.
- Maybe hire a dumpster or a professional cleaner for bigger pieces.
- Ensure hazardous materials, such as nails, screws, and glass, are sealed in the correct containers.
- Remember to stick to local laws for disposing of construction waste types.
- Plus, clean the area after the debris is removed. This includes vacuuming dust and wiping down surfaces with cleaning products.
HomeAdvisor’s study found the cost of removing debris from a bathroom remodel could be $200-$600, depending on the amount and type of waste.
Deep cleaning the space
To get a shiny, fresh bathroom, do these 5 steps:
- Clear the area. Remove any extra items from shelves and countertops.
- Dust everything. Light fixtures, mirrors, vents – even hard-to-reach parts.
- Scrub all fixtures with cleaner. Don’t forget the toilet, bathtub, and sink.
- Clean the grout between tiles. Use a grout cleaner or baking soda and water.
- Mop the floor. Use a suitable cleaner. Reach all corners.
Also, wear gloves when using chemicals and air out the room to avoid fumes.
For centuries, people have wanted clean spaces. Ancient Rome and Egypt had elaborate baths. Today, deep cleaning our bathrooms gives us tidy, inviting places to be.
Organizing and decorating the renovated bathroom
Maximize storage with shelves and cabinets. Make it visible with transparent containers.
Add a touch of class with scented candles, stylish soap dispensers, and luxurious towels.
Introduce some plants to create a soothing atmosphere. Low-maintenance options work best for bathroom conditions.
Display your own style with artwork or photos. Pick pieces that match the bathroom design.
Dimmable lights provide a calming atmosphere. Make it more comfortable with a stool or chair.
Towels and bathrobes add both functionality and beauty.
Be creative with vintage mason jars for toothbrush holders. It adds a unique touch to the countertop and shows eco-friendliness.
Conclusion
Take on renovation projects with confidence! It’s complex, but rewarding. We’ve explored the many aspects of renovating a bathroom – from budgeting to materials. Follow these steps and transform the space into something stunning and functional.
- For a unique touch:
- Incorporate eco-friendly features, like low-flow toilets or LED lighting.
- Ventilation prevents mold and mildew growth.
- Add stylish hardware or lush towels.
Pro Tip: Get the necessary permits and consult with professionals. This ensures compliance with building codes and safety standards.
Ready to start? With careful planning, smart choices, and creativity, you can achieve a bathroom that reflects your style. Have fun and happy renovating!
Frequently Asked Questions
Q: How much does it cost to renovate a bathroom?
A: The cost of renovating a bathroom can vary depending on several factors, such as the size of the bathroom, the materials used, and the extent of the renovation. On average, a bathroom renovation can cost anywhere from $5,000 to $30,000.
Q: How long does it take to renovate a bathroom?
A: The duration of a bathroom renovation project depends on the complexity of the work and the size of the bathroom. Generally, a small bathroom renovation can take anywhere from a few days to a week, while a larger and more intricate renovation may take several weeks or even months.
Q: Do I need a permit for a bathroom renovation?
A: The need for a permit for a bathroom renovation depends on local building codes and regulations. In many cases, a permit is required for significant changes involving plumbing, electrical, or structural work. It’s important to check with your local authorities to determine if a permit is necessary for your specific renovation project.
Q: Can I renovate a bathroom myself or should I hire a professional?
A: While some individuals may have the skills and knowledge to undertake a bathroom renovation themselves, it can be a complex and time-consuming process. Hiring a professional contractor can ensure that the renovation is done properly and efficiently. It’s essential to evaluate your own capabilities and consider the scope of the project before deciding.
Q: What should I consider when choosing bathroom fixtures and materials?
A: When selecting bathroom fixtures and materials, consider factors such as durability, functionality, aesthetics, and budget. It’s important to choose materials that can withstand the bathroom’s moisture and humidity levels. Additionally, opt for fixtures and materials that align with your preferred style and will complement the overall design of the bathroom.
Q: How can I maximize storage in a small bathroom renovation?
A: To maximize storage in a small bathroom renovation, consider utilizing space-saving solutions such as installing wall-mounted cabinets, adding shelves or niches, using stack-able storage containers, and opting for a vanity with built-in storage. Additionally, de-cluttering and organizing your belongings can help create a more efficient and spacious bathroom.