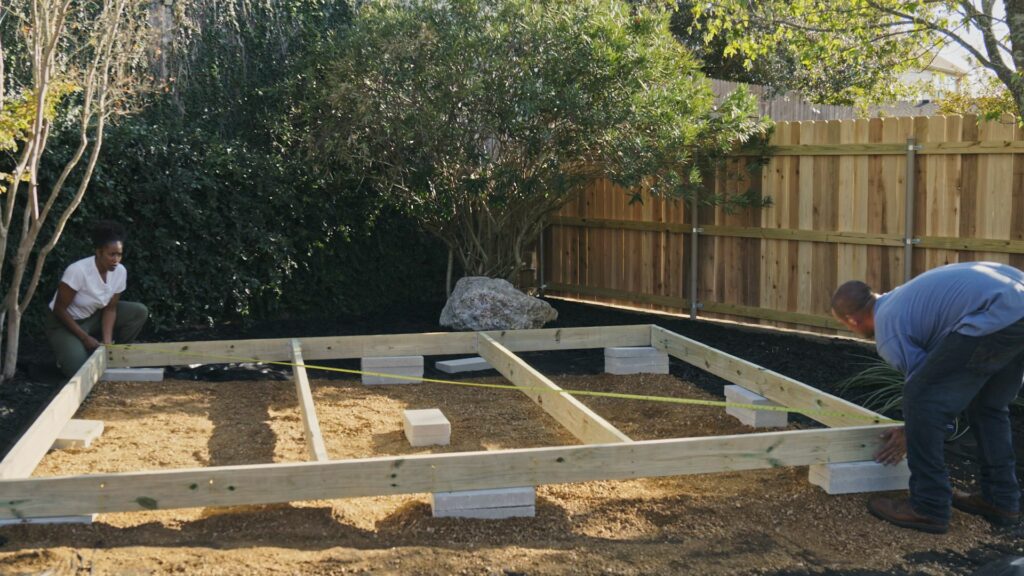
You must be extremely accurate and patient when building platform steps for a deck. The task can be finished in one to two days, but accuracy is essential before you can fit the steps. If your measurements are a little off, you risk someone slipping off or the entire structure tumbling off the platform. To construct your platform steps for a deck, follow the simple instructions below:
Table of Contents
How to Build Platform Steps for a Deck
Step 1: Measure, Calculate, and Mark
Get one of the wooden boards and mark your measurements on it before you attempt to do anything with the steps. These will provide the staircase’s zigzag shape when viewed from the side. To make the marks, use a stake.
Start your calculations by extending the level bar from the platform area outward toward the open region. Use the measuring tape to determine the platform’s height or the step’s highest point of ascent. You may then calculate the ratio between the number of steps and the height of each one.
Keeping the hardwood boards’ 2×6 measurements is advisable as they provide a comfortable level of safety to prevent accidents like trips and falls.
Step 2: Select the Design of the Deck Steps
The entire staircase must fit within the height that has been pre-recorded. However, you might not be able to use the framework boards as intended.
You can always add a step even if you’re afraid of exceeding the measurement. However, you can select a straight-on step series that leads right to the platform surface. If so, you’ll need to take particular care when taking measurements and ideally do a test fit before installing the hardwood planks on the faces that were left exposed after sawing the diagonal marks.
Step 3: Set the Wooden Planks in Place
Place the two zigzag wooden boards against the platform at a distance of less than 6 feet. Without sufficient thickness, they will be challenging to balance.
On the platform’s vertical face, however, you can attach clamps to hold the boards in place at one end. The clamping will significantly lessen the vertical gravity reaction on the zigzag boards. If necessary, drill and screw the clamp.
Step 4: Nail Your step Planks
The ends of the step planks, which rest on the zigzag faces, should be nailed. For this stage, you might or might not need drills and screws, depending on the thickness of the board.
Always keep safety and prudence in mind. For all carpentry work, especially where homeowners are involved, first aid help must be present.
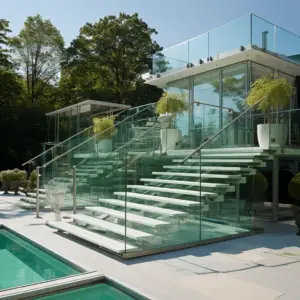
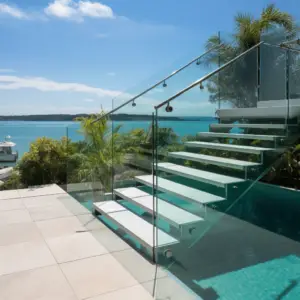
Is a Glass Deck Railing Construction Important?
Heavy glass railing is a technique to make the deck safer while also enhancing its appearance. Upper decks undoubtedly need a safety feature to prevent objects from falling off the edge. Although most glass rails have rounded and polished edges known as “seamed” edges, some are encased in an anodized aluminum frame.
How Do You Construct a Glass Deck Railing?
Design
The metal framework for the glass support should be built initially. Before ordering the glass panes that will fit into the metal framework, it is most cost-effective to design the metal structure.
If possible, maintain as many of the glass panels to the same size. In addition to saving the glass firm from custom-building each panel, this will simplify installation. To make fitting more manageable, ensure the panels are 1/4 to 3/8 inch smaller than the space between the inside of the vertical frames.
Construction
The baseplates should be attached to the deck following your original design. Use stainless steel screws of the heaviest grade that will fit through the base plate holes. When working with glass panels, you should check the measurements frequently since even a discrepancy of 1/8 inch can cause much trouble.
Install the bottom channel and uprights. The bottom channel holds the glass upright, and the uprights prevent the glass panels from swaying.
To firmly secure the uprights and channel, use screws made of stainless steel. Ensure that the inside of the upright or bottom grooves, where the glass will rest, is free of any visible screw points.
Glass is extraordinarily sturdy, yet even a single screw-caused ding can make an entire pane hazardous. Over each screw connection point and any other protuberances, place felt or urethane pads.
Each glass panel should be carefully inserted into the groves on the sides of each pair of uprights. The bottom channel should be able to accommodate the glass snugly.
Never try to force the glass into position. The glass pane should only be gently shaken into place rather than slammed. The aluminum extrusion and the vertical edge of the glass should be separated by roughly 1/8 to 1/4 inch on each side. This will prevent a series of cracked glass panels from appearing on the deck and allow it to move throughout the year.
Top Rail
To prevent the glass from chipping, you might wish to place another extrusion or molding on top of the glass. This needs to be cut such that each panel’s width (measured from left to right) is greater than it by 0.25 inches. Utilize silicone exterior grade clear glue to attach the top rail parts.
Cleaning
You can clean the glass with a squeegee or a commercial cleaner and a rag after the silicone has had time to set, which takes around 48 hours. To prevent hard water build-up from accumulating on the glass panes, it is a good idea to employ a commercial cleaner once every two weeks.
Final Take
This article has discussed the four steps used to build platform steps for a deck. These steps will be useful if you are looking forward to constructing some platform steps for your deck. The article has also highlighted the importance of having the glass rails on a deck and offered some easy steps to install the glass rails on a deck.