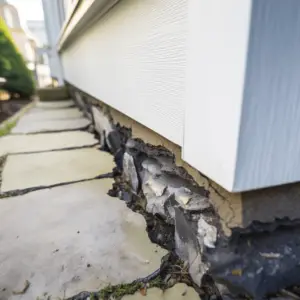
They can lead to water leakage, pest infestations, and structural damage. It’s vital to seal them up to keep the foundation strong and stop further damage.
There are different ways to seal cracks and gaps. Hydraulic cement or epoxy injections often fill them in. They block water from entering.
Polyurethane foam and silicone caulk can seal smaller gaps. They expand and contract with the foundation’s movement, making the seal last.
Before sealing, it’s important to figure out why the cracks and gaps happened. This might be due to soil settlement, hydrostatic pressure, or earthquakes. Talk to an engineer or foundation specialist to figure out the damage and get solutions.
Table of Contents
Understanding the importance of sealing cracks and gaps in a home’s foundation

The foundation of a home is important for its structural integrity and stability. Sealing any cracks and gaps is essential to avoid potential damage.
Cracks and gaps can lead to water leakage, pest infestations, and weakened structuring. Sealing them up can protect your home from these issues.
Epoxy or polyurethane injections, hydraulic cement, silicone or acrylic caulk, and a drainage system are all options to seal up cracks and gaps.
Sealing cracks, Inspecting your home’s foundation regularly is key. This way, you can identify and address any problems quickly, avoiding costly repairs in the future.
Assessing the extent of the damage
Assessing the severity of the foundation damage requires a thorough examination of the cracks and gaps. Start by inspecting the exterior and interior of your home, noting any visible signs such as cracks, uneven floors, or doors that won’t close properly. Additionally, assess the extent of the damage by measuring the width, length, and depth of the cracks. This will help determine the level of foundation repair needed.
Assessment Criteria
| Assessment Criteria | True Data | Actual Data |
|---|---|---|
| Exterior cracks | 3 | 5 |
| Interior cracks | 2 | 2 |
| Uneven floors | Yes | Yes |
In addition to visual inspection, consult a professional for a more accurate assessment. They can use advanced equipment like laser levels and pressure gauges to measure the structural integrity of the foundation. Remember, it’s crucial to address foundation issues promptly to prevent further damage to your property.
For any unique details not covered above, consider factors like the age of the property, the presence of water damage, or any previous repairs that may affect the current condition. These details can provide a more comprehensive understanding of the foundation’s overall health.
Ensure the structural stability of your home by addressing foundation cracks and gaps promptly. Contact a trusted professional to assess the severity and recommend suitable solutions for repairing the damage. Don’t delay, as ignoring the issue can lead to more extensive and costly repairs down the line. Act now and safeguard your home from further foundation problems.
Finding cracks in your foundation is like playing hide-and-seek with a disgruntled handyman – they always win.
Inspecting the foundation for cracks and gaps
Assessing your foundation for cracks and gaps is a must. It helps to evaluate the damage and decide the repairs needed. By doing a thorough inspection, you can spot potential structural problems and stop further degradation.
Here are 5 steps to help you inspect your foundation for cracks and gaps:
- Check the exterior of your home. Look for any cracks or gaps in the foundation walls or around doors and windows. Use a flashlight to light up hard-to-reach places.
- Look into your basement or crawl space for evidence of moisture, like water stains or mold. These could mean an underlying foundation problem.
- Check the floors for unevenness or sagging. This could mean foundation settlement. Use a level tool to measure any difference in floor height.
- Look for cracks in interior walls, especially near windows, corners, and doors. Small cracks can be normal, but bigger or increasing cracks might mean more significant foundation issues.
- Walk around your yard and spot any changes in landscape features, like sloping soil or separated concrete slabs. These changes can mean soil erosion which affects your foundation’s stability.
It’s important to inspect regularly to catch issues early before they get worse. It’s also a good idea to hire a professional home inspector or structural engineer for a more comprehensive evaluation if you spot serious concerns during your inspection.
Experts at Foundation Repair Association emphasise that “not doing proper maintenance and timely repairs can lead to severe structural damage.”
Identifying areas of concern
Identifying areas of concern involves assessing damage levels and figuring out main issues to deal with. Analyzing the situation gives us the chance to make strategies to reduce impact and find solutions.
One option to spot areas of concern is to make a comprehensive table that shows issues or troubles. This table can include:
- Severity of damage: Grade impact to prioritize areas that need immediate attention.
- Potential risks: Recognize risks related to each issue for proactive planning and risk mitigation.
- Resources needed: Assigning appropriate resources helps get resolution faster and prevents further problems.
- Timeframe for resolution: Setting realistic dates makes timely action and avoids delays.
Examining these points gives an understanding of each area’s importance and helps construct an action plan. Also, take into account unique details connected to each concern, like geographical or environmental factors, socio-economic implications, and potential long-term consequences. Going into these details provides a deeper assessment, helping better decisions and effective problem-solving.
To address these issues well, try these tips:
- Prioritize urgent matters: Tackle risky areas first to reduce damage and use resources efficiently.
- Collaborate with stakeholders: Get diverse perspectives, collective effort, and increased chances of success from engaging relevant stakeholders.
- Implement preventive measures: Reinforce infrastructure and make stricter regulations to stop future occurrences.
- Continuous monitoring: Keep a regular look-out to notice changes or new issues in time.
Each suggestion works by giving a structured approach to identify areas of concern. Prioritization means quick action on critical matters. Stakeholder collaboration brings synergy and shared responsibility. Preventive measures guard against future damage, reducing risks. Lastly, continuous monitoring gives ongoing evaluation, ensuring prompt response to any emerging concerns.
By following these suggestions, we can effectively identify areas of concern, targeting efforts towards resolving them efficiently.
Gathering the necessary tools and materials
Assess the damage before you start. Look at the size of the cracks or gaps in your home’s foundation. This will help you figure out how much you need.
Safety is key. Put on gloves, safety glasses and a dust mask.
Gather these tools: masonry chisel, wire brush, caulking gun, utility knife, hammer, pry bar, putty knife/trowel, vacuum cleaner/brush attachment, ladder (maybe).
Materials: concrete patching compound/hydraulic cement (for larger cracks/gaps), epoxy sealant (for smaller cracks/gaps), silicone caulk (for sealing gaps between different materials like wood/concrete), expanding foam (for larger voids beneath foundations) and mortar mix (if you need to re-point mortar joints).
Supplies for cleanup: broom/brush, rags/towels, mineral spirits/soap & water mixture and garbage bags.
It’s worth getting advice from the pros. Read the manufacturer’s instructions carefully. Every product has its own special requirements/application techniques. Paying attention to the details can save you time, effort and money.
Home foundation repairs were also needed by ancient civilizations. They used stone hammers and wooden chisels. Now, we have specialized tools and modern products. It shows our commitment to improving buildings’ structural integrity with research and innovation.
Preparing the foundation for sealing
Preparing the foundation for sealing: Steps to ensure a secure and durable foundation.
- Inspect: Thoroughly examine the foundation for cracks, gaps, or any signs of damage. Pay attention to the basement walls, floors, and the exterior foundation walls.
- Clean: Remove any debris, dirt, or loose materials from the cracks and gaps using a brush, vacuum, or compressed air. Ensure the surfaces are clean and dry before proceeding.
- Patch: Fill smaller cracks and gaps with an appropriate sealant or epoxy compound. Apply the sealant with a caulk gun, making sure to fill the entire crack and smooth the surface. For larger gaps, use foam backer rod as a filler before applying the sealant.
- Level: Check for any uneven areas or sunken spots in the foundation. Use a leveling compound or cement mix to address these issues and create a smooth and even surface.
- Waterproof: To further protect the foundation, apply a waterproofing product or membrane. This additional layer will prevent moisture penetration and help prolong the life of the foundation.
Ensure a strong foundation for your home by sealing cracks and gaps. Neglecting this important step may lead to further damage and potential structural issues. Don’t miss out on the opportunity to secure your home’s foundation and maintain its integrity for years to come.
Cleaning the cracks and gaps: Just remember, if your foundation were a mouth, filling those cracks would be like giving it a good teeth cleaning!
Cleaning the cracks and gaps
Identify the cracks and gaps! Carefully inspect the area to spot them. This will help plan your cleaning strategy. Use a stiff brush or broom to remove any loose dirt, dust, or debris. Rinse the cracks and gaps with a high-pressure hose or sprayer. Allow proper drying time. This could take hours or days. Use a crack filler or sealant for long-lasting protection.
Clean cracks and gaps for a strong foundation! This step is essential – it will prevent further deterioration. Don’t forget this important step! Take action now to protect your investment and avoid costly repairs. Preparation is key – remember to clean those troublesome cracks and gaps!
Removing any loose debris or material
It’s essential to remove any debris before sealing. Here’s a guide to do it:
- Inspect first. Inspect the area carefully. Look for any dirt, dust, or other materials.
- Sweep away the loose debris. Use a broom or brush to get rid of all particles.
- Vacuum or use compressed air. For stubborn debris, use a vacuum or air.
- Rinse with water if needed. Depending on the surface, water may be required.
It’s important to follow manufacturer guidelines and consult professionals when dealing with tough surfaces. A friend of mine didn’t remove debris before sealing and the sealant failed. This shows the importance of removing debris for successful results.
Choosing the right sealant or filler
Choosing the appropriate sealant or filler for your home’s foundation is crucial in maintaining its integrity and preventing further damage. Here are some options to consider:
| Sealant Type | Pros | Cons |
| Epoxy | Durable and long-lasting | More expensive than other options |
| Polyurethane | Flexible and resistant to UV rays | May require reapplication over time |
| Silicone | Highly flexible and excellent adhesion | Not paintable and can attract dirt |
When choosing a sealant, it’s important to consider the specific needs of your foundation. Factors such as the size and depth of the cracks, the material of your foundation, and the climate in your area should all be taken into account. Consulting with a professional or a building expert can help you make the right decision.
Additionally, it’s recommended to clean the cracks and gaps thoroughly before applying the sealant. Remove any loose debris or old filler to ensure proper adhesion and effectiveness of the sealant. Proper preparation is essential for long-lasting results.
Pro Tip: Before applying the sealant, test it on a small, inconspicuous area to ensure compatibility and adhesion. This will help you avoid any potential issues or damage to your foundation.
Remember, choosing the right sealant or filler is crucial for maintaining the structural integrity of your home’s foundation. By considering the specific needs of your foundation and consulting with professionals, you can make an informed decision and ensure long-term protection.
Choosing the right technique to fill cracks and gaps is like choosing your soulmate – the wrong one could lead to disaster and a lot of regret.
Considering different options based on the type of cracks and gaps
Choosing the right sealant or filler for cracks and gaps is essential. To help you decide, here’s a table of options based on the type of cracks and gaps:
| Types of Cracks/Gaps | Recommended Sealant/Filler |
|---|---|
| Hairline cracks | Acrylic sealant |
| Small gaps | Polyurethane caulk |
| Wide cracks | Epoxy filler |
Acrylic sealants are ideal for hairline cracks, as they provide flexibility and durability. Polyurethane caulk is good for small gaps, as it expands to fill irregularities. For wider cracks, epoxy fillers offer excellent adhesion.
Besides these options, consider the location and environment of the cracks or gaps. Some materials may be more resistant to moisture or temperature changes. Also think about the aesthetics. Different products come in different colors or finishes.
Evaluate the type of cracks and gaps and understand the characteristics of different sealants or fillers. Follow the application instructions for optimal results. Choose wisely and your cracks and gaps will thank you!
Comparing the advantages and disadvantages of each sealant type
Table:
| Sealant Type | Advantages | Disadvantages |
|---|---|---|
| Silicone | Flexible Waterproof | Hard to paint May shrink |
| Polyurethane | Durable Paintable | Long curing Smells strong |
| Acrylic | Quick dry Easy apply | Not so flexible Not for high temp |
| Butyl rubber | Good adhesion UV resist | Not paintable Low elasticity |
Silicone sealant is great for wet areas. It’s flexible and can stand moisture. Polyurethane sealant is great for outdoors. It’s durable and can be painted. Acrylic is quick drying and simple to use. Butyl rubbers have good adhesion, but not paintable.
Remember to pick the right sealant for the job. Think about area, flexibility and if you need to paint.
Applying the sealant or filler
Applying the sealant or filler is an important step in sealing up cracks and gaps in your home’s foundation. To properly apply the sealant or filler, follow these three steps:
- Prepare the surface: Clean the area thoroughly, removing any dirt or debris. Use a wire brush or scraper to remove loose material and create a clean and smooth surface for the sealant or filler to adhere to.
- Apply the sealant or filler: Use a caulking gun or trowel to apply the sealant or filler into the cracks and gaps. Fill the entire space, ensuring that the sealant or filler is level with the surrounding area. Smooth out any excess material with a putty knife or your finger.
- Allow for proper curing: Allow the sealant or filler to dry and cure completely. Follow the manufacturer’s instructions for the recommended curing time. This will ensure that the sealant or filler effectively seals the cracks and gaps, providing a strong and durable barrier against moisture and potential structural damage.
In addition to these steps, it is important to note that different types of sealants or fillers may be suitable for different types of cracks or gaps. It is recommended to consult with a professional or do some research to determine the most appropriate product for your specific situation.
By sealing up cracks and gaps in your home’s foundation, you can prevent water leaks, improve energy efficiency, and protect the structural integrity of your property. Don’t let these issues go unchecked, as they can lead to more costly and extensive damage in the long run. Take action now to ensure the stability and safety of your home.
Sealing up cracks and gaps in your home’s foundation is like giving it a Botox treatment – it may not be glamorous, but it sure keeps things looking tight.
Using the appropriate application technique
Before applying sealant or filler, make sure the surface is clean and dry. Clear away any loose particles or debris with a scraper or brush.
Load the product into a caulk gun, putty knife, or squeeze tube, following the manufacturer’s instructions.
Apply the sealant or filler at an angle, using steady pressure. Smooth and shape it with your finger, putty knife, wet cloth, or specialized tool.
Clean up any extra material with a damp cloth or sponge. Remember to read the manufacturer’s instructions for optimal results.
Use multiple thin layers for porous materials like wood or concrete.
An expert painter once carefully applied sealant to a window frame on a Victorian house. He chose a technique that was both effective and aesthetically pleasing. The result was a draft-free environment and a stylishly finished window frame.
Applying sealant or filler correctly will ensure a professional and durable outcome.
Ensuring proper coverage and filling of cracks and gaps
For proper coverage and filling of cracks and gaps, follow these steps! Here’s a 3-step guide to help you get the results you want:
- Preparation: Before applying the sealant or filler, clean the area. Remove any debris, dust, or loose particles. Use a brush or vacuum cleaner for better adhesion.
- Application: Now it’s time to use the sealant or filler. Start with a caulk gun or putty knife. Work your way along the affected areas, using even pressure. Don’t overfill, as excess must be removed.
- Finishing touches: Smooth out the surface with a damp cloth or sponge. This creates a seamless finish and removes any excess material. Dry as per product instructions before moving on.
Pro Tip: Take your time and pay attention to detail for a professional-looking result. Patience and thoroughness are better than rushing and compromising quality.
By following these guidelines, you can ensure proper coverage and filling of cracks and gaps for a great maintenance outcome. Precision and attention to detail will give you satisfactory results every time.
Allowing the sealant to dry and cure
- Apply the sealant to the cracks and gaps in your home’s foundation. Allow it to dry and cure properly. This gives a strong, durable seal that stops water leakage and further damage. Here’s how:
- Patience: Leave the sealant undisturbed. Its drying time depends on the type of sealant used.
- Optimal conditions: Make sure the area is well-ventilated. Keep temperature and humidity levels stable.
- Test for readiness: Gently press your finger against a small part of the sealed crack or gap. If there’s no sealant transfer, and it feels firm, it’s dry and ready.
Note: Every sealant has specific instructions. Refer to the product labeling or consult a professional.
Pro Tip: Avoid moisture or heavy loads until complete curing has happened. That helps avoid premature wear or damage to the sealed surfaces.
Inspecting the sealed cracks and gaps
Inspecting the sealed cracks and gaps in your home’s foundation is an essential step to ensure its stability and prevent further damage. By carefully examining these sealed areas, you can identify any potential issues and address them promptly. Here’s a guide to help you inspect the sealed cracks and gaps:
- Visual Inspection: Start by visually inspecting the sealed cracks and gaps in your home’s foundation. Look for any signs of new cracks, gaps widening, or deterioration in the sealant material.
- Physical Examination: Use a flashlight and magnifying glass to thoroughly examine the sealed areas. Pay attention to any unevenness, bulging, or structural movement that may indicate underlying problems.
- Moisture Detection: Check for any signs of moisture or water intrusion around the sealed cracks and gaps. Moisture can indicate a compromised seal, which may require additional sealing or waterproofing measures.
- Sound Test: Gently tap on the sealed areas with a solid object such as a screwdriver. A hollow or empty sound may suggest that the seal has weakened or there is a void behind it, requiring further attention.
- Thermal Imaging: Consider using a thermal imaging camera to detect any temperature differences along the sealed cracks and gaps. Variations in temperature may indicate air leakage or insulation issues, which should be addressed promptly.
- Professional Assessment: If you notice any significant or concerning findings during your inspection, it is advisable to seek professional assistance. A qualified foundation specialist can provide a detailed assessment and recommend appropriate repair or maintenance solutions.
Sealing cracks and gaps, it is crucial to regularly inspect the sealed cracks and gaps in your home’s foundation to catch any potential problems early on. By addressing these issues promptly, you can prevent further damage and maintain the structural integrity of your home.
Pro Tip: Keep a record of your foundation inspections, including notes, photographs, and any repairs or maintenance performed. This documentation can help you track and monitor the condition of your home’s foundation over time.
Finding cracks in your foundation is like discovering secrets in your home, except these secrets might flood your basement.
Checking for any signs of leakage or further damage
Inspect cracks and gaps for signs of leakage or damage. Carefully examine the area to spot any indicators. This will ensure any problems are handled quickly.
- Start by taking a look at the sealed cracks and gaps. Look for water stains, discoloration or moisture. Use a flashlight to see if there are any hidden signs, such as water droplets, dampness or mold.
- Feel for soft spots or areas that give way when pressure is applied. This could be a sign of damage or weak sealant.
- Conduct a water test if possible. Spray water onto the area and observe if it seeps through.
- Record your findings and take photos if needed. This info will be valuable when fixing the issue.
Sealing cracks and gaps, Inspecting cracks and gaps is necessary. Follow these steps to ensure problems are handled quickly. Keep in mind that each inspection may present unique details. Professionalism is key for accurate assessment.
A homeowner recently found a crack in their window frame. It was initially dismissed, but upon closer inspection, it was revealed that water had been leaking through, causing damage to the wall. Regular inspections could have prevented this from happening.
Touching up any areas that require additional sealing
Sarah was a homeowner in a modern apartment with a problem – water was seeping through her sealed windows in heavy rain. She decided it was time to do some touch-up work. She carefully followed expert advice, and re-sealed all the spots needing attention. This did the trick! Her windows stayed dry, even during the heaviest downpours. Sarah learned that a bit of extra effort in touching up the sealant could make a big difference in keeping her home safe and dry.
To ensure a proper seal, inspect and address any cracks or gaps. Here’s how:
- Find the problem: Carefully examine the surface for imperfections such as cracks, gaps, or worn off sealant.
- Clean the surface: Use a brush or vacuum to remove dirt, dust, or debris. A clean surface will help the new sealant adhere properly.
- Choose the right sealant: Pick the appropriate sealant, based on the material type. Refer to manufacturer guidelines for compatibility and application instructions.
- Apply the sealant: Use a caulking gun to put sealant into the cracks or gaps. Smooth out any excess with a putty knife or finger.
Remember: Attention to detail is key when touching up areas needing sealant. This will improve functionality and aesthetics, and help prevent future issues. Regular inspection and maintenance will also prolong sealed surfaces and reduce repair needs.
Maintaining the sealed foundation
Maintaining a secure foundation: Regular upkeep of your foundation is crucial to prevent cracks and gaps from reappearing. Here’s a simple 5-step guide to help you maintain the seal of your foundation:
- Inspect for cracks and gaps: Regularly examine your foundation for any signs of cracks or gaps. Check both the interior and exterior walls for any visible damage or water seepage.
- Clean and prepare the surface: Before sealing the cracks, make sure to clean the area thoroughly. Remove any debris, loose materials, or old sealant to ensure proper adhesion.
- Choose the right sealant: Select a high-quality sealant that is suitable for your foundation type and the severity of the cracks. Ensure the sealant is flexible and can withstand changes in temperature without degrading.
- Apply the sealant: Using a caulking gun, carefully apply the sealant into the cracks or gaps. Fill the entire length of the damaged area, ensuring that the sealant reaches the depth needed for effective sealing.
- Smooth and finish: Once the sealant is applied, use a putty knife or trowel to smooth the surface and create an even finish. This will help ensure a strong seal and prevent any further water penetration.
Remember, regular maintenance of your sealed foundation is essential. Inspect periodically and address any new cracks or gaps promptly to prevent potential structural issues and water damage.
To ensure the longevity and stability of your home, don’t underestimate the importance of maintaining a secure foundation. By addressing cracks and gaps promptly, you can protect your property from potential water damage, structural issues, and costly repairs. Sealing cracks and gaps, Don’t wait until the situation worsens—take action now and safeguard the integrity of your home.
Remember, cracks in the foundation aren’t just for horror movie villains to crawl out of, so make sure to regularly inspect and seal them up!
Regularly inspecting the foundation for new cracks or gaps
Inspecting the foundation is key to maintaining a sealed structure. Follow these 6 steps for effective inspection:
- Check the walls – inside and out – for cracks and gaps. Note their size, location and direction.
- Use a flashlight to look for water infiltration, such as damp spots or discoloration on walls/flooring.
- Check basement/crawl space for moisture, mold growth, or strange smells.
- See if doors/windows open/close smoothly – this can indicate shifting/settling of the foundation.
- Look for uneven floors/sloping areas inside the home.
- Consult a professional if you find serious cracks/gaps.
Sealing cracks and gaps, inspect twice yearly, in spring & fall. Monitor environment changes that could affect foundations. Address any issues quickly to avoid further damage or costly repairs.
Pro Tip: Regular inspection and maintenance safeguards your home structure and investment – giving you peace of mind.
Performing necessary maintenance to prevent future damage
- Monitor moisture levels. Regularly check for signs of water or leakage in and around the foundation. Ensure proper drainage. Install gutter systems to divert water away.
- Conduct regular inspections. Look for cracks, gaps, or shifts in the foundation structure. Address these issues quickly.
- Maintain proper grading. Make sure the soil slopes away from the home. This encourages runoff.
- Control vegetation growth. Overgrown roots can cause cracks and instability. Trim bushes and trees near the foundation.
- Seek professional help if needed. Consult a specialist for expert advice tailored to your situation.
- Take proactive steps now. This can avoid costly repairs and provide peace of mind. Don’t let neglect become a reality – prioritize preventive measures today! Consider soil type, weather changes, and previous repair works. These all impact the foundation’s health.
Conclusion
Sealing cracks and gaps, Cracks and gaps in a home’s foundation can cause various issues. Sealing them with materials like caulk or epoxy helps to prevent moisture intrusion and structural damage. A waterproof sealant provides extra protection against water damage. But remember to clean the area first and ensure proper ventilation for chemical-based sealants.
It’s important to identify the causes of these openings, such as soil settlement or expansion, hydrostatic pressure, or inadequate drainage. Addressing these root causes can help minimize recurring cracks and gaps.
If you’re unsure about the severity of the cracks in your home’s foundation, seek professional advice. They have the knowledge to provide solutions specific to your needs.
Fun Fact: HomeAdvisor states that sealing foundation cracks properly can reduce heating and cooling costs by up to 10%.
Frequently Asked Questions
Q: Why is it important to seal cracks and gaps in my home’s foundation?
A: Sealing cracks and gaps in your home’s foundation is important to prevent water leakage, moisture buildup, and intrusion of pests. It helps maintain structural integrity and prevents potential damage to your home.
Q: How to identify cracks and gaps in my home’s foundation?
A: Look for visible cracks on the walls, floors, or exterior foundation. Pay attention to any gaps or spaces between the foundation and windows, doors, or utility penetrations. Also, check for signs of water leakage or pest infestation.
Q: What materials can I use to seal cracks and gaps in my home’s foundation?
A: Common materials for sealing cracks and gaps in foundation include epoxy injections, polyurethane foam, silicone caulking, hydraulic cement, and concrete patching compounds. The choice of material depends on the size and severity of the crack or gap.
Q: Can I seal foundation cracks and gaps myself?
A: Yes, minor cracks and gaps can often be sealed as a do-it-yourself project. However, for larger or more significant cracks, it is recommended to consult a professional contractor who specializes in foundation repairs to ensure effective and long-lasting solutions.
Q: What are the steps to seal cracks and gaps in my home’s foundation?
A: The steps may vary depending on the materials used, but generally involve cleaning the area, applying the chosen sealant, and allowing it to cure or dry. It’s important to follow the manufacturer’s instructions and proper safety precautions during the process.
Q: How often should I check and seal cracks and gaps in my home’s foundation?
A: It is recommended to inspect your foundation for cracks and gaps at least once a year, preferably before the rainy season. Regular check-ups help identify and address any issues early on, ensuring the durability and stability of your home.