
A soggy yard can harm your landscape, and excessive water around your home can cause leaks or cracks in the foundation. Pop-up drain emitters can help you combat these issues if they are correctly installed and positioned.
Pop-up emitters are made from durable materials that stand up to the elements. Their plastic construction makes them easy to install, and they won’t rust or corrode.
They have a wide range of applications and can prevent pooling on decks, sidewalks, patios, basements, and more. Although the pop-up drain emitter is convenient, there are some issues you should know about.
Table of Contents
Drain Emitter Pop Up Problems and Their Solutions
Are Pop-Up Drain Emitters Necessary?
A gutter on the roof of most houses collects and directs rainwater to the downspout. Typically, the water collects far from the house’s foundation, keeping it from damage.
However, this system can fail to function properly at times and can lead to corrosion of the foundation. Here is where the pop-up drain emitter comes into play.
Pop-up drain emitters connect to the downspout through a canal and provide an efficient drainage system. A downspout’s emitter diffuses water when pressure builds within the gutter.
By using the pop-up drain emitter, you can drain water to an area far from your house’s foundation.
Moreover, it uses hydrostatic pressure. As a result, the flat lid of the emitter will remain closed when it is dry, so you won’t have to worry about running your lawnmower over it.
Common Pop Up Drain Issues
Freezing during winter
Pop-up drains can freeze if left with standing water despite the system’s design to move water away from the house.
A proper pitch of your underground downspout extension is essential for your yard to have adequate drainage. A water entry point roughly 2 inches above the water exit point (the pop-up drain emitter) will facilitate water flow.
However, freezing concerns arise during warm winter days. If snow melts on your roof, but the ground below the pipe is still frozen, the water may become trapped and freeze again when temperatures drop.
In this situation, the emitter will spread the water as long as enough water is to start the system.
Broken lid
When water is flowing heavily, the lids of the emitters open. The covers stay closed when the emitters are not in use, so debris and critters can’t get inside. Most often, pop-up emitter lids break after being struck by a lawnmower.
Clogging
Unlike traditional emitters, pop-up emitters do not allow any debris or pests to enter their interior. But If the gutter isn’t cleaned properly or debris is left, it may clog.
How to Fix Pop-Up Drain Emitter Problems
Even though they may have their problems, with a bit of insight, one can solve them. Let’s examine the solutions to these problems to know how to handle each one when you encounter them.
Freezing
When installing the complete drainage system, you need to keep in mind a couple of things to avoid pop-up emitters freezing in winter. One is to set up the gutter extension properly.
When installing gutter extensions, ensure the drainage system has the correct pitch based on the length of the tubes. The water will then flow rather than collect where it is too high or too low.
Two, you can put a heat cable on the gutter. As the heating cable adjusts to the temperature in the environment, the tube remains warm enough. As a result, it prevents water from freezing.
In winter, disconnect the system. The drainage system needs to be disconnected if necessary. Also, consider burying your system deeper in a colder climate to prevent freezing.
However, it is important to remember that the deeper you bury the pop-up drain, the more water is required to flush it out. Consider an emitter without an elbow or a “replacement emitter” for deeper pipes.
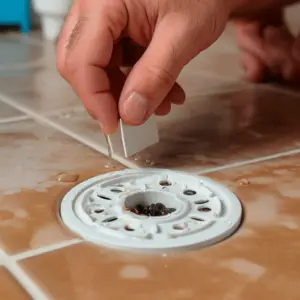
Broken Lid
For starters, you’ll want to loosen up the dirt around the pop-up emitter. There is enough overhang on the lids so that you can pop them off quickly. To gain access under the lid, use a screwdriver.
You might need to use a bit of elbow grease to loosen emitters that have settled in the ground. Snap the new lid on after removing the old one! Alternatively, you can tape the lid shut with some waterproof tape for safety.
Clogging
When your pop-up drain system is not working as it should, or you suspect a clog, you can easily clean your system. Start by inspecting the entry and exit points.
If there is a clog, it is likely at the gutter or the entry drain. Dispose of any debris that is found and flush the rest with water. Look for obstructions in your emitter and ensure the top can close.,
You can use a hose to flush out any extra debris that has entered your pop-up drain system. During the cleaning process, run water through the system for a few minutes. Clogs in the middle of your pipe between the entry point and your emitter may need excavating.
Steps to Repair a Pop-up Drain Emitter
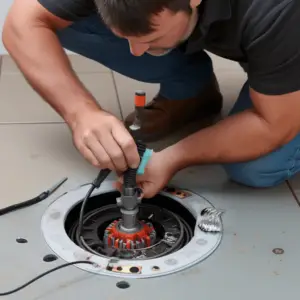
Sometimes, the pop-up drain emitter needs to be repaired or replaced after getting damaged. The emitter can be dug up and repaired based on the level of damage.
Taking the grass off and digging up the damaged emitter is the first step to replacing the pop-up drain emitter. Next, remove the emitter from the drain tube. Now install the new emitter. Don’t change the slope, as this would interfere with the function of the new emitter.
Pop-up emitters are a simple and effective way to release water safely in areas with poor drainage and vulnerable structures. When the water pressure from the rain exceeds the set point for the device, a spring-loaded pin pops up and releases a burst of water.
However, they have their challenges. The pop-up drain must be installed correctly. When the ground level drops, they can sit above the ground. As a result of this, the grate will collect debris and block the drainage. It is essential that all pop-up grates are kept clean and regularly checked.