The kitchen is one of the spaces where you spend most of your time than any other area of your house. Therefore it is natural to give it a fresh touch. Redecorating your kitchen doesn’t have to be expensive.
Do you wonder how? Well, you can use chalk paint! You can transform your kitchen cabinets with chalk paint as it gives a fantastic matte look to cabinets. Chalk paint is excellent to work with and requires minimal preparations, reducing the time for sanding before applying paint.
Can you paint kitchen cabinets with chalk paint? Yes, painting your kitchen cabinet using chalk paint can save you time. It is budget-friendly and brings a unique elegance.
What is chalk paint?
It is a unique paint. Applying it creates a chalk-like look on a surface, forming an ultra-matte finish. It is latex- based meaning you can use water to clean spills.
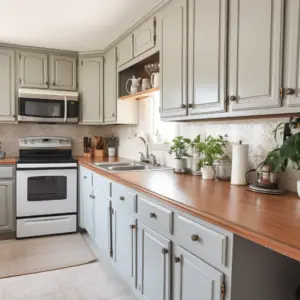
Can You Paint Kitchen Cabinets With Chalk Paint? This is How to Do it
Before we begin painting, it is essential to protect the other surfaces you’re not painting, using newspapers for the floor and plastic sheets or drop cloths for the different areas you are not painting.
Safety Precautions
It is recommended that you put on safety equipment when painting yourself by wearing a face mask and goggles to protect yourself from fine particles and toxic fumes. Also, remember to put on gloves to keep the paint mess splatters off your hands.
What Tools and Materials Do You Need?
Materials
- Chalk paint of your choice
- Degreaser
- Polycyclic Protective finish
Tools
- Drill/ screwdriver
- 150-grit sandpaper
- Shop towel
Remove Cabinets and Hardware
Remove every hardware, including knobs and pulls. Using a screwdriver, remove the cabinet doors and drawer fronts from the cabinet boxes. Put them safely aside for reuse when you are done unless you want to change the hardware.
Seal the Holes Using Filler (Optional)
This step is crucial only if you propose changing new hardware to get a smooth finish. Seal the holes with wood filler in all holes from the old hardware and allow it to dry, then smooth with sandpaper.
Cleaning Of the Cabinets
Please never should you skip this step! Thoroughly clean the cabinets for an even chalk paint coat and, most significantly, prevent any grease stain from showing through the paint.
Use a degreasing agent and a dish cloth to clean all cabinets that you will apply paint and ensure they’re clean and good.
Apply the Chalk Paint
Apply the chalk paint using even strokes to the kitchen cabinets and drawer fronts utilizing a paintbrush.
Start with the cabinet bases, then the doors, and from the inside of the door. It is good to start with the doors of the rarely used cabinets to gain momentum for the work.
Because chalk dries very fast, ensure you work speedily while allowing the paint to dry between coats.
Repeating the coats two to three times is paramount if you want your finish to be splendid and robust.
Apply the top coat to protect the color. Various poly finishes yellow more than others, so before you apply, use wax if you want, although the poly is highly advised in areas like the kitchen.
It is necessary to consider the yellow factor when choosing a color
Seal the Cabinets
Typically, chalk paint is sealed with wax, and you can apply it at this point. Use a polycrylic sealer to protect the chalk paint from daily wear and tear. Wax also prevents the yellowing of the color that comes with age.
Strictly follow the instructions on the label and ensure you give it time to dry between coats thoroughly.
Repeat the procedure as that of paint
Therefore, the water-based polycrylic sealer is recommended. So, apply the sealer and give it adequate time to cure. A perfect cure may take up to two weeks. Handle them gently during this period.
Install Hardware and Hang Cabinets
Place back your old or existing hardware on your cabinets and drawers. Reattach the drawer fronts and install drawers.
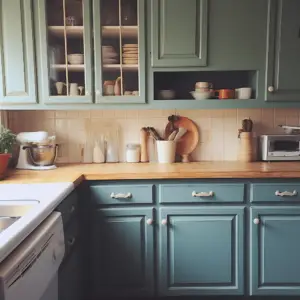
Finally, hang your cabinets and enjoy the refreshed look of your kitchen through a simple chalk paint coat.
Pros of Chalk Paint
- It doesn’t need much prep work when it comes to chalk paint
- It adheres to most surfaces clean and dry without priming or sanding
- Chalk paint is thicker than regular paint. Therefore, you only require 1 or 2 coats to cover a piece entirely. Chalk paint also can last longer than other paints because you use less to cover more.
- It is water-based, meaning it has low VOCs (Volatile Organic Compounds) and no smell.
It is forgivable if you make an error like spilling it, it can be easily cleaned, or even if it drips in an unwanted area, you wipe using wipes.
- Although it takes a few steps, it forms a long-lasting finish once fully cured. As the wax top coat cures, it hardens, offering a robust finish resistant to scuffs and scratches.
Cons of chalk paint
Chalk paint is a bit more costly than acrylic paint, etc. Additionally, it needs sealing and special tools. Also, for a long-lasting finish, you need a protective topcoat which requires a special brush or even a stiffer paint brush due to its thick consistency for practical work.
All these requirements amount to it being costly.
Chalk paint, regardless of feeling dry when you touch it, the truth is it takes time to dry in between coats thoroughly. It requires time to see the best result. Therefore, you should wait 24 hours between the paint coats for a solid and good finish.
Without a top coat application, white chalk paint scratches easily. Nevertheless, it takes close to a month. Wax is applied in two processes.
Using chalk paint on your cabinets is a great way to give your kitchen a new look. It works spectacularly in the kitchen cabinets to bring that refreshing look. For great results, adhere to the instruction shown above. The process may sound costly, but worth it, and remember to involve an expert to help you out.