- Ceiling fan installation, Installing a new ceiling fan may seem hard, but with the correct knowledge and tools, it’s easy! This article will guide you through the steps of installing a fan.
- Why have a ceiling fan? Not only does it keep you cool in the summer, but it also circulates warm air in colder months. Plus, it’ll save on your utility bills! And, it adds style to any room.
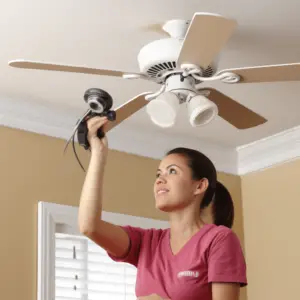
- Let’s get started! Gather all necessary tools and materials, like a ladder, screwdriver, wire stripper, and the fan kit. Before beginning any electrical work, remember to turn off the power supply.
- Follow all instructions provided by the manufacturer for assembling the fan components. Pay attention to details like connecting wires and tightening screws.
- Mount the fan on the ceiling in the center of the room. Attach any additional accessories and blades. Then connect and secure all electrical wires according to the color-coded instructions. Lift the fan onto the mounting bracket and lock it in.
- You did it! Now sit back and enjoy the comfort and breeze. Clean and maintain your fan regularly for years of use. So why wait? Install a fan today and experience the cool and comfortable space. Follow these steps and you’ll reap the benefits of a newly installed fan.
Table of Contents
Tools and materials needed
Ceiling fan installation a successful installation of a new ceiling fan, having the right tools and materials is a must. Here are the essential items:
- A secure ladder/step stool to reach the area where the fan will be.
- A screwdriver set – Phillips and flathead.
- An adjustable wrench for loosening/tightening nuts and bolts.
- A voltage tester to make sure power is off.
- A wire stripper/cutter tool to prepare wires.
Also, have these materials:
- The fan, with blades, bracket, canopy cover, screws.
- A ceiling fan mounting kit, including any extra hardware.
- Wire nuts for connecting wires.
- Connectors or electrical tape for insulating wires.
- Plywood or mounting board for heavier fans.
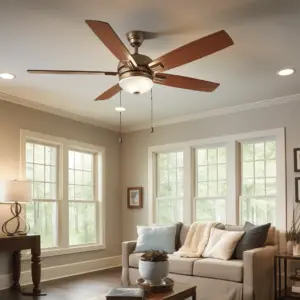
Choose the right size fan for your room. Think of the room size, ceiling height, and airflow.
And don’t forget: Read the manufacturer instructions before starting! It’s key for a successful outcome.
Safety considerations
Safety is key when installing a new Ceiling fan installation. Neglecting proper precautions can lead to accidents or damage. Here are some essential points to bear in mind:
- Secure the area. Clear the work area of any obstacles or potential hazards. This will help avoid any mishaps during installation.
- Turn off the power. Before beginning any electrical work, switch off the power to the room at the circuit breaker. This will reduce the risk of electric shock.
- Use the right tools. Always use the correct tools for the job and ensure they’re in good condition. Damaged tools can be dangerous.
- Avoid overloading circuits. Confirm that your electrical system can handle the extra load of a ceiling fan. Overloading circuits can cause overheating and create a fire hazard.
- Follow manufacturer instructions. Read and stick to the instructions provided by the manufacturer. Each model may have specific requirements, so it’s important to adhere to them.
- Hire a professional if needed. If you’re not confident in your electrical or carpentry skills, hire a licensed professional to install your ceiling fan. Safety comes first.
Always wear appropriate PPE when installing the fan, such as gloves and safety glasses. These measures can reduce the chance of injuries.
A friend of mine didn’t turn off the power supply before trying to install a Ceiling fan installation. Contact with live electricity shocked him painfully. Thankfully, there were no severe injuries. But it was a reminder of the importance of safety during home improvement projects.
Remember, take the necessary precautions when installing a ceiling fan. Protect yourself, your property, and ensure the long life of your new addition. Stay safe!
Step-by-step instructions:
- Installing a new ceiling fan? Consider this first!
- Get the necessary tools and equipment. A ladder, screwdriver, wire stripper, pliers, and electrical tape are all needed.
- Shut off the power supply from the main circuit breaker or fuse box.
- Assemble and prepare the components.
- Secure them and make sure they are level.
- Connect wires and install fan blades. This can be tricky, so you should call a professional electrician if you need help.
My friend Jack learned the hard way. He tried to install a ceiling fan himself, made a mistake and caused damage to his electrical system. Don’t be like Jack! Know your limits and get professional help if needed. The safety of you and your fan is worth the investment.
Tips and troubleshooting
Installing a new ceiling fan can be a piece of cake if you know what to do! Here are some tips and tricks to make it easier:
- Pick a fan that fits your room. Measure the height of your ceiling and size of the space for proper airflow.
- Switch off the power of the existing light fixture before starting. This will stop any accidents or electrical problems.
- Find the ceiling joist with a stud finder so you can mount the fan securely. If there isn’t a joist, install a ceiling fan brace kit for extra support.
- Assemble the fan according to the manufacturer’s instructions. Connect wires properly and secure them. Double check all connections before adding the blades.
Troubleshooting:
- If it wobbles, make sure all screws and brackets are tight. Use a balancing kit if needed.
- If it’s too noisy, align and fasten all components correctly.
- If it doesn’t work, check all wires are connected correctly and power is being supplied.
- If there is poor airflow, adjust the blades at the right angle.
Plus:
- Use quality hardware and components for a dependable, long-lasting fan.
- Get professional help if you’re unsure about installation or have any unexpected difficulties.
Follow these tips and troubleshoot any issues to install your new ceiling fan with ease!
Conclusion
Wrapping up this article on installing a ceiling fan? Here are some key takeaways:
- Follow the step-by-step instructions and safety precautions.
- Choose a good spot, secure it against accidents, and check the electrical connections.
- Opt for energy-efficient fans to reduce environmental impact and save electricity.
Some unique details to consider:
- Noise level rating. You don’t want loud noise.
- Some modern fans come with remote controls or smart features.
A cool fact: According to Consumer Reports magazine, a ceiling fan can make a room feel up to 10 degrees cooler without changing the temperature. Comfort in hot summer months and cost savings on air conditioning!
Frequently Asked Questions
1. How do I choose the right ceiling fan for my room?
When selecting a ceiling fan, consider the size of your room. For rooms up to 144 square feet, a fan with a blade span of 42-48 inches should suffice. Larger rooms may require fans with blade spans of 52 inches or more. Also, make sure the fan comes with a motor that is powerful enough to circulate air effectively.
2. What tools do I need to install a ceiling fan?
The tools you will need include a ladder, screwdriver, wire stripper, pliers, electrical tape, wire nuts, and a circuit tester. It is also recommended to have a partner to assist you in holding the fan during installation.
3. Can I install a ceiling fan myself?
Yes, many homeowners are able to install ceiling fans themselves. However, if you are not comfortable working with electrical wiring, it is best to hire a professional electrician to ensure the installation is done safely and correctly.
4. How do I safely install a new ceiling fan?
First, turn off the power to the circuit you will be working on from the main electrical panel. Then, follow the manufacturer’s instructions to assemble the fan and attach it to the ceiling bracket. Carefully connect the wiring according to the provided diagram, ensuring all connections are secure. Finally, turn the power back on and test the fan.
5. Is it necessary to have a ceiling fan with a light fixture?
No, it is not necessary to have a ceiling fan with a light fixture. However, if you require additional lighting in the room, choosing a fan with a built-in light can be a convenient option.
6. How do I maintain and clean my ceiling fan?
To maintain your ceiling fan, regularly dust the blades and wipe them clean with a damp cloth. You may also use a mild detergent solution for tougher stains. Additionally, check the fan’s screws and connections periodically to ensure they are tight and secure.