Installing a New Light Fixture, Embarking on the journey of installing a new light fixture? Let’s dive in! Safety first, so always make sure to turn off the power supply before starting any electrical work. Get yourself equipped with the necessary tools and materials like wire cutters, screwdriver and wire connectors.
Remove the old fixture carefully. Unscrew screws or disconnect wires. Pay attention to how it was wired so you can replicate it correctly when connecting the new one. Mount the new light fixture as per the manufacturer’s instructions. Connect the wires and tuck them back.
Test it out! Switch on the power supply and see if your space is illuminated. If it is, congrats! You have successfully installed a new light fixture! Not only does it look great, but it also enhances energy efficiency in your home.
Table of Contents
Tools and materials needed

For a light fixture install, the right tools and materials are a must! Check out these three main items you’ll need:
- Screwdriver – You’ll need one to remove the old fixture and attach the new one. Have a Phillips head and flathead ready.
- Wire cutters/strippers – These will help with cutting and stripping the electrical wires. Accurate cuts and proper stripping are needed for a safe, efficient connection.
- Voltage tester – Always test the voltage of the wires to confirm they aren’t live. A voltage tester will help you verify it’s safe to proceed.
Plus, don’t forget to get wire nuts, electrical tape, a ladder/stool (if needed), and the new fixture before starting.
Note: The design and install of a light fixture may require specific tools or materials. Make sure to read and follow the manufacturer’s instructions.
A True History:
In the early 1900s, light fixture installation was much harder than it is now. Electricians had to manually calculate and use trial-and-error methods as there were no standard tools or materials. Thanks to advancements in tech and safety standards, today’s installs are simpler and more efficient.
Safety precautions
Safety is key when putting up a new light fixture. Here are some tips to stop accidents and make the installation process smoother:
- Switch off the power source from the electrical panel before beginning.
- Wear protective gear like safety goggles and gloves to avoid injury.
- If using a ladder or elevated surface, make sure it’s steady and secure.
- Don’t overload circuits; the wattage of the new fixture should match the circuit’s capacity.
- Never touch live wires with your bare hands; use insulated tools for electrical connections.
- If unsure of any step, get help from a professional electrician.
Additionally, be sure to clean the area before starting the installation. Get rid of dust and debris that could interfere with wiring connections.
Securely anchor fixtures in the ceiling or wall with suitable hardware to stop potential damage. This ensures stability and prevents future accidents.
Finally, test the new light fixture before you’re done. Turn on the power and check if the light works properly. If there are any problems, check everything again to make sure it’s all secure.
Heed these tips to make sure your lighting project goes smoothly. Stay careful throughout each step to reduce risks and guarantee a successful outcome.
Step 1: Turn off the power
Safety is always the number one priority when dealing with electrical appliances, so it’s important to understand the significance of turning off the power before installing a new light fixture. Here’s a step-by-step guide:
- Locate the main electrical panel in your home.
- Open the panel door with a screwdriver or appropriate tool.
- Find the circuit breaker labeled for the area you’re working in.
- Switch the corresponding circuit breaker off by flipping it to the “off” position.
- Use a voltage tester to double-check that no electricity flows to the area.
- Let others in your home know that you turned off the power for safety.
When opening the electrical panel door, use a suitable tool like a screwdriver to avoid damage. Label and become familiar with each breaker’s purpose before beginning.
Never underestimate the importance of turning off the power. Doing so can prevent electric shocks and fires. Take this precaution seriously and ensure your safety and that of those around you.
Step 2: Remove the old light fixture
Before installing a new light fixture, it’s important to remove the old one. Here’s how to do it safely:
- Switch off electricity: Locate the circuit breaker and turn off the electrical supply.
- Unscrew the bulb: Carefully unscrew the light bulb and set it aside. Don’t touch any live wires.
- Loosen the canopy: Unfasten the canopy or trim located at the base of the fixture.
- Disconnect the wires: Unscrew wire nuts or remove screws connecting the wires.
- Detach and remove fixture: Without pulling any wires, detach the old fixture from its mounting bracket or screws.
Be mindful of safety when removing an old light fixture. Have your tools ready, take note of the wire colors, and secure any loose ends with electrical tape. Be careful and organized, and you can easily finish the removal process and move on to installing the new one.
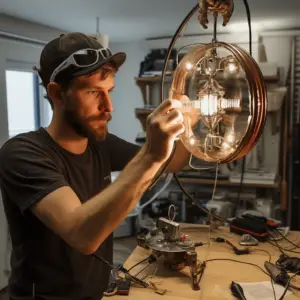
Step 3: Install the new light fixture
Ensure you confidently complete these steps to install your new light fixture!
- Turn off the power from the main breaker box. Safety first!
- Remove the old fixture carefully, taking note of how it was attached and where wires are connected.
- Connect the new fixture’s wires to the ceiling, fasten them securely with wire nuts.
- Secure the new fixture to the ceiling using screws or any provided mounting hardware. Check it’s stable & aligned.
Double-check all connections and follow safety guidelines. You can transform your room into a lit haven! Illuminate & elevate the ambiance with a touch of sophistication. Enjoy!
Step 4: Test the new light fixture
A new light fixture needs testing to ensure it’s working properly. Here’s a step-by-step guide:
- Turn on the power: Flip the main breaker panel switch.
- Flip the wall switch: On position.
- Observe illumination: Check for flickering or dimming.
- Test functions: If any, like dimming. Make sure they work.
- Verify connections: Ensure they are secure and connected.
- Turn off and inspect: Flip the wall switch and main breaker panel. Check again.
Issues with no illumination or odd behavior could mean an issue with the installation or the light. In such cases, ask a professional electrician for help.
My friend recently installed a new light fixture. She went through the above steps and was thrilled to see her chandelier illuminate beautifully. It gave her a sense of accomplishment and satisfaction.
Conclusion
- Installing a new light fixture is essential. To do it properly, follow these steps:
- Choose the right fixture for your space.
- Prepare the area for installation.
- Connect the wiring.
- Turn off the power before beginning.
- Check the wattage ratings.
I recently moved into a new apartment. I wanted to add character to the dining area. So, I decided to install a pendant light. I was new to DIY projects but still tackled this task cautiously and with enthusiasm.
I researched online and followed step-by-step instructions. In an hour, I successfully installed the light fixture. The result was stunning! It transformed the dining area into a warm and inviting space. This experience taught me valuable skills and boosted my confidence for future home improvement projects.
Frequently Asked Questions
FAQs on How to Install a New Light Fixture:
Q1: Do I need a professional electrician to install a new light fixture?
A1: No, you can install a new light fixture on your own as long as you have basic electrical knowledge and follow safety precautions. However, if you are unsure or uncomfortable with electrical work, it is always recommended to hire a licensed electrician.
Q2: What tools and materials are required to install a new light fixture?
A2: The tools you’ll need may include a screwdriver, wire strippers, pliers, a voltage tester, and a ladder. The materials required typically include the new light fixture, electrical wire connectors, and possibly a junction box if one is not already present.
Q3: How do I safely disconnect the old light fixture?
A3: Before starting any electrical work, always turn off the power at the circuit breaker. Once the power is off, remove the screws or bolts securing the old fixture to the electrical box, disconnect the wires by unscrewing the wire connectors, and carefully lower the fixture from the ceiling.
Q4: How do I properly install the new light fixture?
A4: Start by attaching the mounting bracket provided with the new fixture to the electrical box. Next, connect the wires from the fixture to the corresponding wires in the electrical box, following the color-coded or labeled instructions. Finally, secure the fixture to the mounting bracket using screws or bolts.
Q5: How do I ensure the new light fixture is safely and securely installed?
A5: Double-check that all connections are tight and secure, and ensure there are no exposed wires. Use a voltage tester to verify that the power is off at the circuit breaker before working on the electrical connections. Once installed, test the fixture by turning the power back on and switching it on/off.
Q6: What additional precautions should I take during the installation?
A6: Always adhere to local electrical codes and regulations. If you are unsure about any step, consult the manufacturer’s instructions or seek guidance from a licensed electrician. Additionally, avoid overloading the electrical circuit and make sure to use compatible light bulbs.