Food coloring candy melts are a fairly basic confectionary mixture and the main ingredients involve a general mixture of sugar and oils, particularly vegetable oils such as olive oil and coconut oil.
Table of Contents
Can You Add Food Coloring to Candy Melts?
Yes, you can. Candy Melts are a store-bought confectionary so they come ready-made and you do not have to do modify them further to enjoy this sugary goodness. They are easy enough to make at home and you are also free to modify them to your liking.
Other ingredients include milk solids such as powdered milk, and flavors such as vanilla, chocolate, mint, peppermint, caramel, white chocolate, and food color.
When adding food color to your candy melts, make sure you use only the oil-based kind.
Candy melts are dependent on the oil in them to solidify and maintain an even consistency that will break and seize up, cracking the candies if you add any water-based food colors.
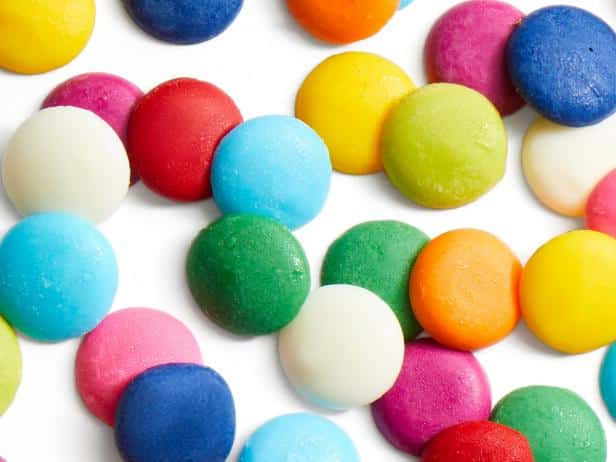
Candy melts come in various colors and flavors and modifying them to suit your preference is fairly easy.
Since candy melts are meant to be used as a topping or coating for other types of treats anyway, modifying them is at the very least, a fun activity to engage in.
How to use Candy Melts to Customize Other Treats
Pretzels, cakes, dark chocolate, waffles and many more can be made even more delicious and tasty just by coating them with candy melts.
You will need a water bath to make this simple treat even better.
Recipe:
- Put water in a larger pan and bring to boil.
- Reduce the flame without putting it out such that you have steady heat keeping the water hot.
- In a smaller pan that can fit snugly into the larger pan, pour a packet or two of candy melts and let them melt in the heat.
- To prevent the melts from sticking to the pan, keep stirring the melts with a wooden or plastic spoon.
- Once they have completely melted add some olive oil. Coconut oil would be even better to add a dash of the nutty flavor if you like the taste.
- Keep stirring as you add coconut oil till the consistency is as viscous as you would like.
- The candy melt paste is ready.
- While still warm, dip your pretzels, cake, or waffles into the candy melt paste and set them aside to cool.
- Once the candy melt has solidified, you can enjoy tour treats this way or you can place them for a few minutes in the fridge to allow the candy melt to cake up around your treat.
- The slightly chilled version is even more savory since the warm sugar may be too much sweetness.
- A light chill will break the overwhelming sweetness.
How to use Food Coloring to Modify Candy Melts
You will need an oil-based food color for this simple recipe:
- Place a pan of water on the stove and bring the water to a boil.
- Reduce the flame without turning off the stove so that you are keeping the water quite hot throughout.
- In a smaller pan, pour a packet or two of candy melts and let them melt into a paste.
- As they are melting keep stirring continuously so that the paste does not stick to the pan.
- Unless otherwise labeled, storebought candy melts will almost always be vanilla flavored and white or cream in color which is an excellent color to work with.
- Food color is not a flavoring so your candy melts should retain the same flavor in this recipe.
- The melted candy melts may be too thick to flow as you would like so if this is the case, the oil-based color should contribute to thinning the mixture to a degree.
- Add the food color of your choice first.
- Food color is a concentrate so use only a drop at a time to avoid over coloring the paste.
- Keep stirring thoroughly and continuously until you get the shade that you would like.
- If the consistency is still too thick, you can add some olive oil or coconut oil to the paste. Mix and stir thoroughly to a consistency of your choice.
- Coconut oil adds a nutty flavor so the end product will be a vanilla coconut candy melt which should taste like a dream.
- Once mixed, turn off the flame and remove the paste from the water bath.
- Using a spoon, scoop the melted paste and pour single spoonfuls onto parchment paper placed over a tray.
- Space them such that they do not spill onto each other.
- Place the tray in the fridge to allow the melts to freeze and solidify.
- Once they are ready you should be able to pick each candy melt from the tray.
- Place the candies in a jar and store them in the fridge.
- Enjoy your red, blue, yellow, or green vanilla coconut candy melts at any time the craving hits you.
How to make candy melts at home
You will need:
- White chocolate
- Olive oil
- Oil-based food color
- Flavors of your choice such as vanilla, peppermint, mint caramel, chocolate, orange butterscotch, coconut, and coffee among others.
Recipe:
- Break the white chocolate into pieces in a bowl.
- The smaller the pieces the faster they will melt.
- In a larger pan, boil water.
- Reduce the flame but don’t put it out.
- Place the bowl of white chocolate in the larger pan so that the white chocolate is in a hot water bath.
- As the chocolate melts, begin to stir and keep stirring continuously.
- Add the coloring of your choice, a drop at a time. Often, just a single drop will be enough to color your candy melts.
- Once the color is achieved, add the oil and flavor of your choice and keep stirring until the consistency is just right.
- Place a sheet of parchment paper on a tray.
- Pour the candy melt mixture into a piping bag and squeeze small amounts onto the tray in the size of candies.
- Ensure they do not spill onto each other.
- Refrigerate the candies and once they solidify, pour them into a jar and store them in the fridge to be enjoyed at your leisure.