Fixing Laminate Flooring Gaps, With time and constant wear, even unsightly gaps can start to open up in interlocking laminate flooring. When this happens, it means the floor wasn’t level and straight, or the trim contracted after it was installed.
Either way, it’s a minor issue. In fact, you don’t have to go through the trouble of replacing the entire flooring. Normally, the process involves a simple tube of wood or a mallet and flat object, heavy enough to provide enough traction when tapping the planks back into place.
Table of Contents
How To Fill Gap Between Laminate And Wall: Methods
Well, there are a number of methods to fill the gap between laminate and wall as they have been explained below:
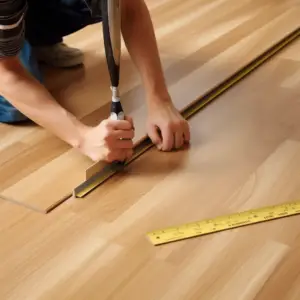
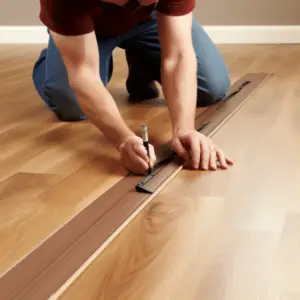
Method 1: Use a Floor Gap Fixer Tool
Nowadays, many companies are producing special devices meant to facilitate the process of filling gaps between laminate flooring and walls.
These items usually take the form of small, heavy rectangular blocks that feature an adhesive rubber face that offers traction to move displaced planks back into place with a few taps of a mallet.
Gap fixers are readily available at most home improvements centers as well as online for around $40-60. But if you’re not ready to spend on this DIY project, you can easily create your own floor gap fixer tool by coating one side of a 4×4 with double-sided tape.
Remove the protective covering
The next step in this method is to remove the protective covering from the adhesive section of the block. Unwrap the plastic covering away to reveal the tacky pad underneath. This way, you will help to grip the laminate plank when you move it back into place manually.
Note that the adhesive pad of the floor gap fixer can be reused provided it is properly cleaned between applications.
Positioning the block
Set the block 2.5 cm or one inch from the end of one of the slipped planks. Place the tool in the center of either plank, then move down firmly on the upper side using hands to anchor it. Make sure it sticks to the plank firmly enough to prevent scooting or slipping while you work.
After that, maneuver the plank in the direction of the gap to close it off. Also, avoid detaching the block once it’s in place unless you really have to; otherwise, the adhesive pad may end up losing its hold.
Work toward the center of the floor
When working with the floor gap fixer, it’s recommended that you resolve the problematic planks towards the center of the floor, as opposed to outwards the wall. This will help to keep the far ends concealed by the baseboard.
If you consider working towards the wall instead, you may end up having to mend gaps in adjacent planks as a result. When fixing more than one plank in a row, you may also want to move the nearby planks inward to keep the spacing consistent and without worsening the gaps.
Use the Mallet to Fix the Gap
This step involves tapping the end of the block with a mallet. Secure the tool with one hand and give the side furthest from the gap a couple of whacks.
This should move the loose plank closer to its neighbors or rather it’s slipped away from it and make it slide along a bit at a time. Keep on tapping the block until the planks rest smoothly against their neighbors.
Take care not to strike the block excessively. This could drift it and even ruin the underside of the flooring. Once you’ve successfully fixed the gap, remove the floor gap fixer by pulling it up.
Do the same to any of the remaining gaps
Using the block and mallet, resolve any other drifted planks that may have occurred in your laminate flooring. Do this carefully to keep the flooring looking neat.
Where necessary, clean out any dust or debris that may have accumulated on the adhesive pad using a damp cloth.
Method 2: Fill the Gaps with Wood Glue
Apply some wood glue using a small utensil like a cotton swab or toothpick. This will help you to access the narrow space much more easily.
Some home improvement buffs tend to use disposable syringes for precision application. The point here is to make sure the glue reaches the grooves where the planks interlock.
You can choose to go with yellow or clear wood glue; what’s important here is to get a high-strength adhesive so that you won’t have to do more repairs in the future.
Also, you can ideally utilize wood putty or caulk to close the gaps in laminate flooring. Just keep in mind that such substances often require special applicators and sometimes additional equipment.
Swab the glue to the revealed tongue of the displaced plank
Inside the gap, there should be a squared edge where the bottom of the plank is meant to fit together with the upper of the next in the same row. Apply a generous coating of glue to the surface, targeting the even coverage from one end to the other
Make sure you apply enough glue to enhance the capability of the repaired flooring holding up well under constant foot traffic.
Push the separated planks together to mend the gap
Hit the separated plank at an angle constantly with the palm of your hand. A more subtle approach is to place both hands flat against the plank and control it carefully towards its neighbor using your full body force.
Wipe away the excess glue
Using a damp rag, blot at the glue squeezing up through the cracks in the repaired gap. Then go over the seam until all residues are removed. Note that any adhesive left behind by mistake could dry and create rough texture underfoot or even produce mild discoloration in the laminate.
Quick Tips
If you’re repairing gaps close to a wall, you may want to pry off the baseboard covering the end of the plank and replace it after repositioning the plank.
A heavy rubber-soled boot can be used in place of a commercial floor gap fixer tool. You just need to make sure it’s clean before using it on the flooring.