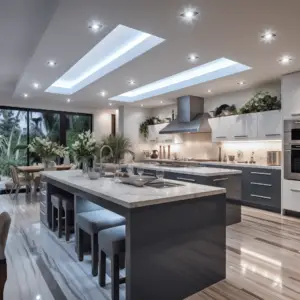
Recessed lighting is an excellent way to illuminate your space without the elaborate fixtures required with hanging or pendant lighting.
The small paneling affixed to the ceiling takes up little to no space in your room making it feel even more spacious.
Most bulbs used in recessed lighting are LED bulbs that consume up to 60 percent less energy.
Despite the need for quite a number of bulbs to sufficiently supply a room with light, the energy consumption still remains quite low. The bulbs are also highly durable and the need to change out bulbs is rare.
The fact that they are fixed into and not just against the ceiling makes them a better option with regards to safety, especially where children are involved.
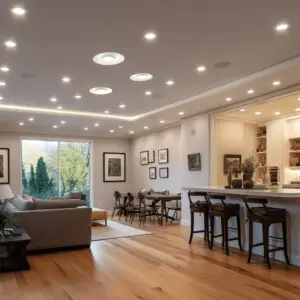
The array of shapes and colors is also a merit of recessed lighting and this provides an avenue to play around with the ambiance, mood, and general aesthetic of the house.
If you have this kind of lighting, you have noticed that it is frustrating when one of the bulbs goes off leaving the others working.
Despite sufficient light to be functional, it is frustrating to experience this and the awkward lighting simply must be fixed. It is beneficial to know how to remove and replace damaged bulbs and housing.
Table of Contents
How to remove new construction recessed lights
New construction recessed lights are a type of recessed light whose fixtures are supported by screwing in or nailing the housing frame to the joists in the ceiling.
They are put in during the construction of a new structure. This kind of light can only be installed from above and is, therefore, best removed from above.
There are many buildings that have no attics and a good many others that do not offer any ceiling access once construction is complete, yet their lighting fixtures are new construction fittings.
You may need to remove them to replace damaged lights, install a new model or redo your entire décor. Whatever the reason, it is a tricky task to remove these lights since they were fixed from above which is a space you have no access to.
If you have access to the ceiling through the attic, this will be much easier.
- Switch of power from the breaker which should clearly indicate which circuit you are working with. If you are uncertain, then it would be best to turn off the power from the main breaker to the house before attempting to remove the lighting.
- Use a tester to check if there is any power flowing to your fixture before detaching it. Exposed live wires could cause electrocution.
- Simply unscrew the housing can and the junction box from the wooden joists and pull out the lighting fixture. The entire unit should come off quite easily.
- Replacing it is just as simple since it involves nailing in the new lighting fixture just like the former one. Most if not all new construction lighting frames will not need any new or different fixing method.
If you do not have an attic or if the ceiling space above you is not accessible to you, removing a new construction recessed light will be much harder but it can be done.
- Turn off power to the light you want to remove or to the entire house just to be safe.
- Use a tester to determine that no power is flowing to the light you are removing.
- Remove the panel covering which should just snap of or come off once you have unclipped it.
- Unscrew the bulb by tugging at it lightly in an anticlockwise direction.
- You should be able to spot screws distributed along the frame of the can housing. Using a screwdriver, remove these. If nails were used instead, you will need nail pincers. The tight space means you have to be delicate. These screws or nails fix the light housing to the joists or to the frames of the ceiling.
- Pull the can down. This should give you a clear visual of the junction box and the wires. Disconnect the wires. This can be done simply by hand since no power is flowing through them. Wearing gloves could give you an extra layer of protection and are a good idea.
- Once you have disconnected the wires, you need to cut the can light free. You need a metal cutting tool and cut the whip joining it to the junction box.
- If you intend to replace the light with a new lighting fixture – a remodel fixture – then this is all you need to do and the new light can be installed without much fuss. The new light will be connected to the junction box so leave the junction box in place.
- You will be left with a portion of the lighting frame still attached to the joists and if you do not want to leave it there, you can remove it by hand by pulling on it upwards. Some force is necessary but it will come off.
Recessed Lighting
Once you have successfully removed the new construction recessed light, you will be left with a hole in your ceiling.
If you do not wish to replace the light with another, you will have to repair the hole by applying a patch wood plate and covering it with drywall. This should not be difficult to do.
If your goal is to replace the light, you can fix a new construction can light if you have access to the ceiling from above. Without this kind of access, installing a new construction light is unnecessarily difficult if not impractical.
Use a ‘Remodel Fixture’ which is the kind used when replacing new construction recessed lights in a completed construction that has no ceiling access.
The remodel fixtures lack certain trims and are generally more expensive although the cost of redoing an entire ceiling does not compare to buying and installing a remodel fixture.
The above process requires an intermediate-level understanding of electrical work and should not be attempted if you are a complete novice. If you are uncertain of the process, contact an electrician for assistance.
How To Remove New Construction Recessed Lights Without Attic Access
Cut off the power supply to the specific light where you want to remove or the whole house for safety’s sake.
Remove the trim and light bulb.
Mark the joists- using a stud finder, locate and mark the joists’ location on both sides of the light keeping in mind the joists’ edges are 14-1/2 inches apart.
Mark a square that is about 14-1/2 inches apart
Cut the drywall on the lines with a jab saw multitool or reciprocating saw, and take out the drywall square.
Detach the light by prying out the nails holding the recessed light hangers to the joists
Remove the light housing and detach the wiring.
Cut a ceiling patch in a square of 14-1/2 inches or any size necessary for drywall.
Add Backers- if you’re patching on a large hole in the drywall, ensure to add 3-inch wide by 14-inch long plywood strips on the hanging seams. Put the strips inside the ceiling with half of the width exposed. Secure the strips with drywall screws driven upward.
Finish the ceiling patch with tape, mud, and sand, and paint the ceiling.
Remodel Vs. New Construction Recessed Lighting
Use
Recessed light is a popular choice for most homeowners to offer enough lighting to their homes. However, they are of two types.
Remodel-style recessed lighting is structured to be installed in an existing home, while new construction recessed lighting is for new builds without an already installed.
Installation
With remodel recessed light, installation is through drilling a hole into a ceiling and fixing the housing to the spot. Once through, attach the lights to the top of the drywall or paneling with special clips.
On the other hand, new construction recessed lighting; the fixtures nail the ceiling joists before installing the drywall, giving more support.
Price
Installing recessed lighting is more cost-efficient on a ceiling with existing lights. As a result, new construction recessed lighting eventually costs more. However, its increased stability makes it worth it.
How to Install Recessed Lighting In New Construction
Turn off power
Shut off the power to the room or circuit you’ll be working on or cut off the power to the entire house and ensure it is off using a voltage tester.
Locate the ceiling joists
Locate the overhead ceiling joists to prevent drilling into them-use a stud finder to quicken the process
Take the measurement
Mark the location for the light on the ceiling, ensuring there is no nearby joist
Cut the hole in the ceiling.
Drill the hole with a hole cutting drill bit, then cut the circle for the light fixture using a drywall saw.
Connect and secure wiring (set up the junction box)
The junction box holds all the wires as soon as you install the lights. Open the attached junction box in the morning and clamp the cables from the ceiling to the chest.
Test power
Temporary turn the power on and use a tester to confirm if the electricity reaches the bulb socket, then turn it off until you complete the process
How to Remove a Recessed Light Fixture
Prepare the old cans
Ensure that the power is switched off to your lights and confirm using your electrical tester and gather all your material and equipment
Remove the trim
Screw-in and spring-loaded trim located inside the housing. Unscrew the lightbulb when cool using a screwdriver or pushing against the spring-loaded portion of the trim
Remove the can
Use your flat head screwdriver to push up against each of the four black strips to allow the housing to release from its locked position. Gradually remove the housing as the wires are still intact.
Disconnect the wires
Carefully detach the wires from the old housing and tape them off using electrical tape until you decide to replace the fixture with a new one—additionally, tape off the breaker to keep it from turning on.
If you aren’t replacing the housing, ensure you safely remove the electrical wires.