Bathroom Sink Leaks, Imagine rushing to brush your teeth because you were running late for work (we’ve all experienced this). After turning the tap on to wet your toothbrush, you hear a splash of water coming from underneath the sink. Everything is wet because the bathroom sink is leaking from the drain gasket.
Why is your sink leaking from the drain gasket, and how can you fix it? This guide will walk you through everything you need to know about a bathroom sink leaking from the drain gasket.
Table of Contents
Bathroom Sink Leaking From Drain Gasket: What Could be Causing it?

Below are some of the things that may cause your bathroom sink to leak from the drain:
- The nut holding the drain flange to the sink is loose. Bathroom Sink Leaks only requires a simple tightening to fix this.
- A gasket or rubber washer that is uneven. These must be swapped out for flat, even washers to stop the leaking.
- No plumber’s tape was put between the nuts and drain pipe threads during installation.
- The O-ring, the rubber sealing, or the washer is too tight.
- A drain pipe that is not centered.
How To Fix a Bathroom Sink Leaking From Drain Gasket
Examine the Nut
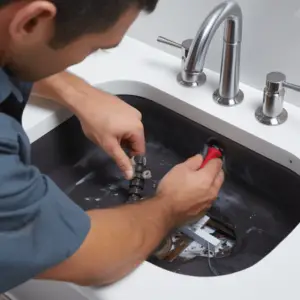
Grab an adjustable wrench and check the nut underneath the sink as soon as you notice a leak in your drain gasket. This piece of hardware often called a “Slip Nut” or a “Drain Nut,” holds the sink to the drain.
To check how tight the seal is, use your wrench. The nut needs to be tightened if the nut moves when the wretch is put. On the other hand, if the nut does not move, it’s conceivable that the rubber gasket has been damaged and needs to be replaced.
Gradually loosen or tighten the nut accordingly, run the water, and check to see whether the problem remains. Bathroom Sink Leaks simple remedy doesn’t work, it’s time to disassemble the drain and look closely at the functional components.
Check the Drain Components for Warps, Cracks, and Other Defects
Loosen the drain nut using the wretch and start disassembling everything. Lay down each drain component after completely disassembling, starting from the left to the right.
Additionally, if your bathroom doesn’t have good lighting, you should use a flashlight or the light on your phone to aid in illuminating and examining each component.
You’re searching for damage to the individual components. Are they cracked, twisted, or warped?
If these questions have a “Yes” response, get a replacement part at your neighborhood hardware store. Some components can corrode when exposed to particular chemicals and cleaning solutions, while others can degrade due to overuse.
Plumber tape and putty can help seal your bathroom drain leak around the threads if you do not see any physical damage to the parts.
Plumber’s Tape and Putty
Plumber’s Tape
To make a perfect, watertight seal, a plumber’s tape is a helpful tool that slips right into the threads of a plumbing joint.
Get a small amount of slack first, then gently press down on the tape and the valve. Next, start wrapping carefully, making sure to keep it tight. Rotate all threads several times as necessary. Snap the tape off the roll once you’re satisfied with the wrapping work, tidy up any leftover tape strings, and you’re ready to go on to the next stage!
Plumber’s Putty
The plumber’s putty fills the gap between the porcelain and metal drain flanges to seal the top side of a sink drain.
The first step in utilizing a plumber’s putty is to ensure that all surfaces are dry and spotless. After that, roll some putty back and forth in your hands until it resembles a worm. After that, insert your putty cylinder into the sink hole by wrapping it around the top of the drain piece.
- Fix and Reassemble.
It’s time to go to work now that everything has been disassembled, that you have an adjustable wrench, plumber’s tape, and putty.
A Guide For Sink Drain Repair and Reinstallation
- Tape the threads of the drain union using a plumber’s tape.
- Around the top of the drain flange, apply a ring of putty that is half an inch thick.
- Reinsert the drain back into the hole, ensuring that it is centered.
- Tighten the nut and gasket beneath the sink.
- Remove any extra putty near the drain.
- Turn on the water and check for leaks
- When to Call a Plumber
It’s time to call a qualified plumbing technician if you’ve tried the measures above and still haven’t been able to stop the leak from the drain. A plumber can quickly identify the problem and inform you if it can be fixed with a few replacement parts or whether the bathroom sink and drain need to be replaced entirely.
How Do You Identify Bathroom Sink That Drains
Sometimes, dripping bathroom sink drains go unseen. To spot these bathroom plumbing issues, you should be aware of the following:
- Damaged or loose flooring in front of the sink: This is a clue that a significant bathroom sink drain leak has been there but has gone undiscovered for some time. If you don’t take action, you can find yourself paying for even more costly damages to your house.
- The cabinet is stained with water: You should have a dry sink cabinet. Water stains indicate leaks.
- Puddles in the cabinet beneath the sink: Depending on how much the sink is leaking, there may be puddles in the cabinet beneath the sink that are not only unsightly but also dangerous to your health and your family’s health.
- An odd and moldy smell in the sink cabinet: This is a sign of a leaking drain that must be fixed.
Final Take
We hope this article has given you all you need to know about a bathroom sink leaking from the drain gasket. Follow the steps listed above to have it fixed today. If you follow the steps and the leaking does not stop, seek some professional help.